React Interview questions for hiring top talent

Brief: Hiring the right ReactJS developer can be challenging, especially when you're trying to assess both foundational knowledge and practical skills. A well-structured set of interview questions helps you determine not just technical proficiency, but also problem-solving ability and code understanding. To support your interview process, we've curated a list of ReactJS interview questions focused on identifying the right candidates who are well-versed in all aspects of React.
Introduction to React
React is a popular JavaScript library for building user interfaces. It’s used for creating reusable UI components and managing the state of complex applications. React is ideal for developers with a JavaScript background. It’s a great choice for building complex, data-driven UIs. It uses a virtual DOM, which improves performance by reducing the number of DOM mutations. It's a declarative framework, making it easier to reason about the code.
Basic React Interview Questions
1. What is React, and why is it used?
React is a powerful JavaScript library that is used to build user interfaces using UI component logic. It uses component-based architecture to connect various manageable components in React into one big project.
Example: Think of it like building a LEGO with multiple components. Instead of building one giant piece, which complicates the component tree. You join various small, manageable pieces and connect them. The same way React uses reusable components to create a website that is both efficient and easy to manage.
Uses:
Used to build interactive UI
Component-based architecture
Single Page application
Large and complex applications
2. What are the key features of React?
React is the hype of the modern web development environment. Built by Facebook software engineer Jordan Walke, it has gained a lot of popularity due to its smooth reloading and strong ecosystem, making it suitable for web applications. Several React features that make it so powerful are
Component-based architecture - React breaks the user interface into components. Each component has its functionality. These components come together to make a React application.
JSX stands for JavaScript XML. This lets you write HTML inside your JS code.
Server-side rendering - For faster loading time and better SEO, React apps can be rendered on the server.
Hooks - Hooks are a bonus to functional components. These add state and lifecycle features to it.
Virtual DOM - React uses a virtual representation of the DOM where the updates are calculated and applied efficiently. Whatever gets updated, first updates in the DOM, then elsewhere.
One-way data binding - Data generally flows in one direction in React. This lets the developer easily track the changes and understand how different parts of the application affect each other. Data flows from parent to child via props. This makes the behavior of the application more predictable.
Strong community - This is the best part of learning React. Even if the React learning curve is simple, it still has a huge community that has your back if you find it difficult to move forward in any part of your application. There are tons of resources, tutorials, and libraries available.
3. What is JSX, and why do we use it?
JSX stands for JavaScript XML. Imagine yourself drawing a picture of what the structure of your jewellery would look like, piece by piece. The same way JSX is used to draw the picture of UI in a manner that is easily understood by React. It lets you write HTML directly inside your JS. Babel is the tool used to transform your JSX to regular JavaScript code.
With JSX
const myElement = <h1>Hello, React!</h1>;Without JSX
const myElement = React.createElement('h1', null, 'Hello, React!');4. What is the difference between functional and class components?
Components are the building blocks of a React application. These are reusable pieces of UI. Every component returns a piece of JSX.
Aspect | Functional Components | Class Components |
|---|---|---|
Syntax | Defined as JavaScript functions. | Defined as ES6 classes that extend React.Component. |
State Management | Uses React Hooks (e.g., useState, useEffect). | Uses this.state for state management. |
Lifecycle Methods | Does not have lifecycle methods (unless using hooks). | Has built-in lifecycle methods (e.g., componentDidMount). |
Performance | Generally faster due to simpler structure. | Slightly less performant due to additional overhead. |
Code Complexity | More concise and easier to read. | More verbose, especially for state and lifecycle handling. |
Usage | Preferred for simpler and stateless components. | Historically used for complex components with state. |
React Version | Available from React 16.8+ (with hooks). | Available in all React versions (pre-hooks). |
5. What is the difference between stateful and stateless components in React?
Aspect | Stateful Components | Stateless Components |
|---|---|---|
State Management | Has an internal state that can change over time. | Does not have an internal state. It only receives data via props. |
Purpose | Used for components that need to track and manage dynamic data. | Used for simpler components that only display UI and rely on props for data. |
Data Flow | Can modify or update their data (state). | Only renders data passed to it via props. |
Usage | Typically used for components with user interaction (forms, buttons, etc.) that need to store or manipulate data. | Used for presentational or "dumb" components that don't manage any logic. |
React Component Type | Usually, class components or functional components with hooks (useState). | Mostly functional components (earlier, class components were also stateless). |
Example | A counter component that updates its state. | A header component that only displays text passed as props. |
6. What are props in React?
Since a React app is composed of multiple components working together, there's often a need to pass data between them. To pass data from a parent component to a child component, React uses props, which are short for "properties". Props are similar to function arguments and enable the customization of form elements and components in your application, including the input value.
Props are read-only for child components, which helps maintain a unidirectional data flow and keeps the application’s data management predictable and centralized.
// Parent Component
function App() {
  return (
    <Greeting name="Arjun" age={25} />
  );
}

// Child Component
function Greeting(props) {
  return (
    <h2>
      Hello, {props.name}! You are {props.age} years old.
    </h2>
  );
}
7. What is a state in React, and how is it used?
State is central to React development. It represents the data managed within a component and can change over time. State is local to the component where it’s defined. When a component’s state changes, React automatically re-renders it to reflect the updated data in the UI.
State allows efficient updates during function execution and enables the management of dynamic data and behavior within a component.
8. How do props differ from states?
Feature | Props | State |
|---|---|---|
Data Source | Passed down from parent components | Managed within the component itself |
Mutability | Read-only from the child's perspective | Mutable within the component |
Purpose | To configure and customize child components | To manage the dynamic data and behavior of a component |
Control | Controlled by the parent component | Controlled by the component itself |
To find a crisp answer to this question, you should prefer giving this a read: Key difference between state and props.
9. What is the virtual DOM, how does it differ from the real DOM, and how does it improve performance?
When creating a large document that requires rigorous modification, it does not make sense to make changes directly in the original document. React avoids manipulating the real DOM on every change, but lets you make changes in the virtual DOM, then compares both and changes only the updates of the real DOM using the process of reconciliation. This helps in smooth re-rendering

10. Why are keys important in React lists, and what issues can arise without them?
Keys uniquely identify elements in a list. They help React determine which items have been added, removed, or changed. React does not compare the content within each item, instead, it relies solely on keys to differentiate them.
If keys are not used properly, the following issues may occur:
Animation glitches
Incorrect component state
Performance issues
11. How do you create a new React application?
Using create-react-app:
npx create-react-app my-app
cd my-app
npm start
Using vite:
How to create a React app using Vite:
Create the app:
npm create vite@latest my-app --template reactNavigate to the project folder:
cd my-appInstall dependencies:
npm installStart the development server:
npm run dev
12. What is Create React App, and why is it useful?
Manual configuration isn’t required, as this sets up Webpack, Babel, ESLint, and all the necessary defaults, allowing you to focus on building your application instead of dealing with tooling.
13. What are controlled and uncontrolled components?
Controlled components in React are used when form data is managed by the component's state, which makes them stateful components. Uncontrolled components, on the other hand, maintain their internal state, with the data being handled directly through the DOM. Controlled components rely on props to manage and control form data, while uncontrolled components use refs to access their current values.
14. How can you handle events in React?
React event handling is similar to handling events in HTML DOM, the only differences are:
React event handlers are named in camel case (onClick, onSubmit, onChange)
You pass a function as the event handler, not a string of JavaScript
The event handler receives a synthetic event object.
15. How do you bind methods in class components?
Binding in the constructor:
JavaScript
constructor(props) {
  super(props);
  this.handleClick = this.handleClick.bind(this);
}
Using arrow functions as class properties:
JavaScript
handleClick = () => {
  // Your handler logic here
};
Using arrow functions in the render method (less performant for frequent re-renders):
JavaScript
<button onClick={() => this.handleClick()}>Click Me</button>
The first two options are generally preferred for better performance and clarity. The arrow function class property approach (option 2) is often considered the most concise and modern way.
16. What is the purpose of the render() method in class components?
The render() method is the most important part of every React class component. Its sole purpose is to describe how the UI should look. This method returns JSX and it's called every time the component needs to re-render.
This method is called whenever there is a need to re-render. The output of this method is used to update the real and virtual DOM.
17. What are React fragments, and when should you use them?
Previously, grouping multiple elements in a component required adding an extra wrapper node to the HTML structure, complicating the component tree. With React Fragments, we can now group multiple elements without introducing additional DOM nodes.
React Fragments are especially useful when:
A component needs to return multiple child elements
You want to avoid extra DOM nodes that may affect CSS styling or layout
The semantic structure of your HTML requires specific parent-child relationships
In all such cases, using React Fragments is the recommended approach.
18. What does returning null, undefined, or false from a component mean?
If a component's render() method or the return value of a functional component is null, undefined, or false, React will not render anything for that component. It will skip rendering that part. This is mainly used in conditional rendering, where if the condition is not met, null can be returned so that nothing is rendered.
19. What are default props, and how are they defined?
If a parent component doesn't explicitly pass a value for a particular prop, the default value will be used. For functional components, you can set the defaultProps property directly on the function. For class components, you can define the defaultProps static property within the class.
20. How do you apply inline styles in React?
You can apply inline styles to React elements using the style prop. The value of the style prop should be a JavaScript object where the keys are camelCase versions of CSS property names, and the values are the corresponding CSS values.
function AnotherStyledComponent() {
  return (
    <div
      style={{
        color: 'green',
        fontWeight: 'bold',
        margin: '20px',
      }}
    >
      This is another inline style.
    </div>
  );
}
21. How do you conditionally render components?
This allows you to display components based on the conditions. Conditional operations such as If/else statements, Ternary operators, using logical AND(&&), returning null/false, etc., are used to define conditions, and if that results in true, the associated UI is returned.
22. What is the significance of this keyword in class components?
In React class components, the this keyword generally refers to the instance of the component itself. It allows you to access:
this.props: The props that were passed down to the component from its parent.
this.state: The component's internal state, which can change over time and trigger re-renders.
Methods you define on the component class: These methods can be used for event handling, updating state, or other component logic.
Lifecycle methods: Methods like componentDidMount, componentDidUpdate, and componentWillUnmount are part of the component's lifecycle and are accessed via this.
However, the behavior of this in JavaScript can be tricky, especially within event handlers. If you don't bind the event handler method correctly,
23. What is prop drilling, and how do you avoid it?
Prop drilling refers to the process of passing data through multiple layers of components, affecting the child component tree, even when some of those intermediate components don't need or use the data themselves.. This can lead to unnecessary complexity and tightly coupled components, ultimately disrupting the unidirectional data flow.

To avoid prop drilling and assist in reusing component logic, you can use state management solutions like the Context API, Redux, Zustand, and others.
24. What is the purpose of setState, and how does it work?
setState() is primarily used to update a component's state and trigger re-rendering of the component and its children. It's recommended that one should not modify React state directly. State directly because that may result in inconsistency in UI.
When we use setState(), it first sets changes in the queue, thereafter performs batching, which is asynchronous, then finally merges updates with the existing state and triggers re-rendering of the component to reflect the updated UI.
25. What are synthetic events in React?
Also called fake browser events, helps React handle events in a better manner. These events ensure consistent behavior across all browsers and support performance optimizations.
26. What are common performance optimisation techniques in React?
Every programming language comes with its own ways of optimizing performance. Here we are mentioning a few measures to do the same in React:
Memoization: This functionality is used to cache the results of the expensive loading functions and reuse those results when the input remains the same.
Avoid re-rendering unnecessarily
Virtualization
Efficient state management
Lazy loading: comes with the advantage of code splitting and a suspense feature
27. How does React manage component lifecycle and rendering?
React tracks components through mounting, updating, and unmounting. Function components use useEffect to manage side effects. Rendering updates the virtual DOM, which React efficiently syncs with the real DOM.
Intermediate React Interview Questions
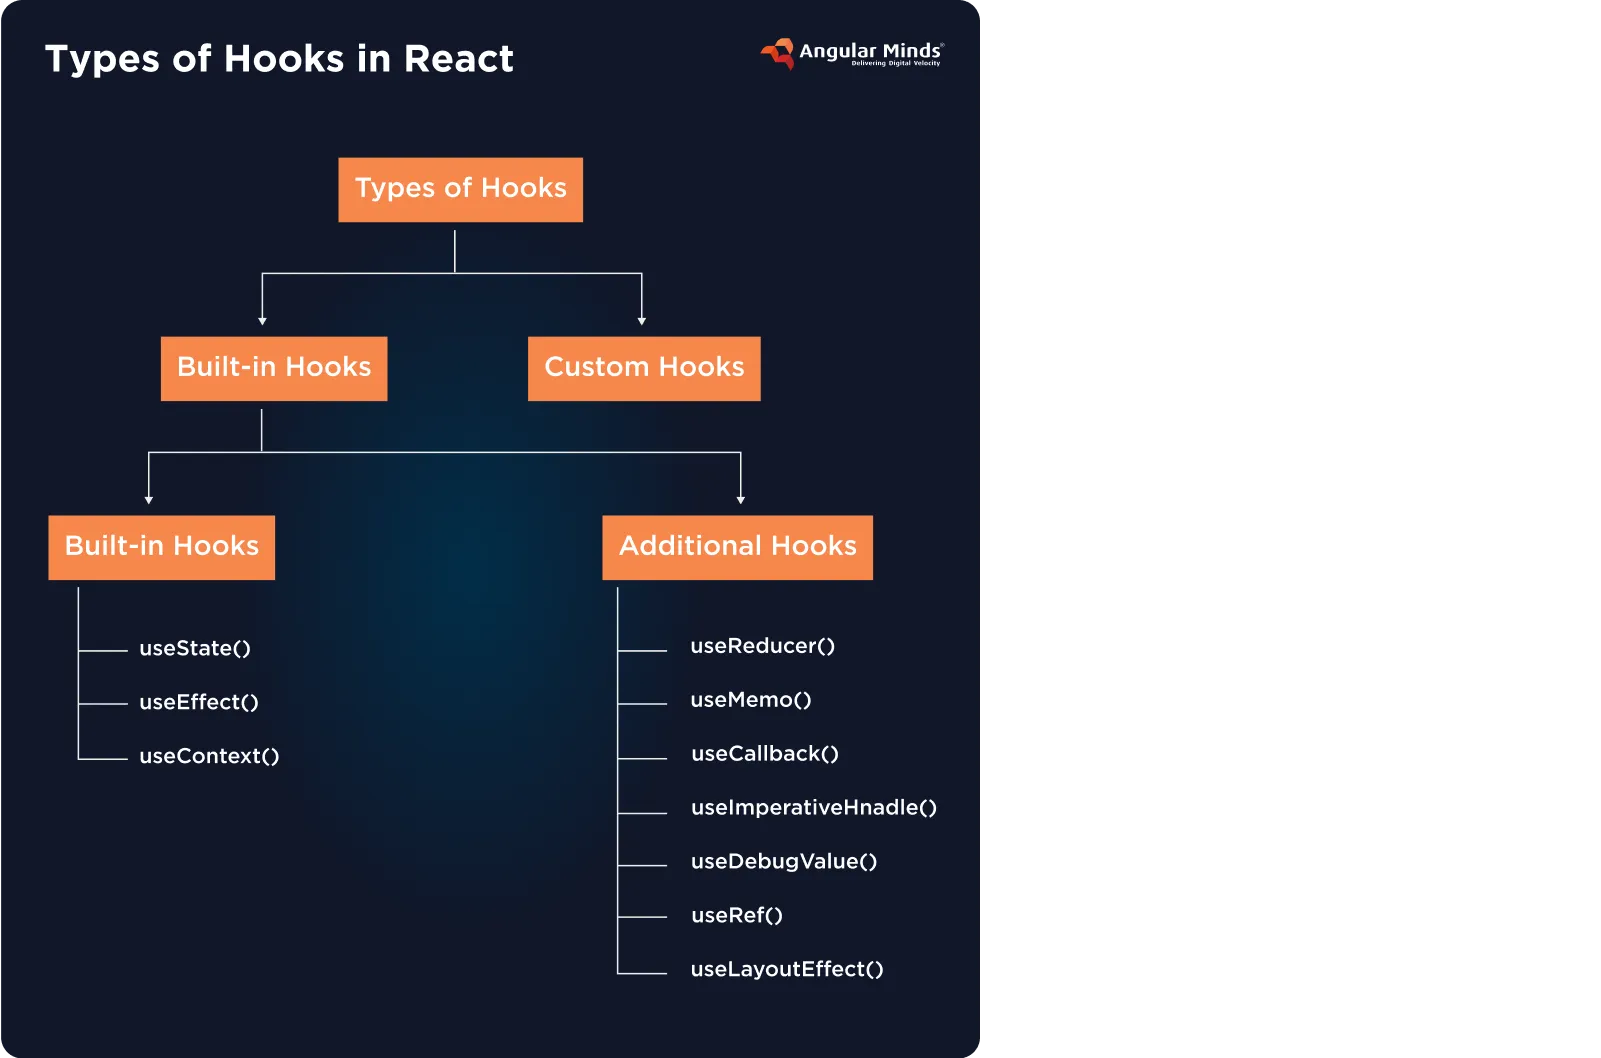
1. What are React Hooks, and why were they introduced?
React hooks are functions that let you manipulate the React state and lifecycle methods. These are used to increase reusability across React components, simplify complex components, and work with state and side effects in functional components.
To get an in-depth review of React Hooks and best practices, give this blog a read.
2. What is the use of the useState hook?
The useState hook lets you add state to functional components. It returns an array with two elements: the current state value and a function to update that value.
Example:
const [count, setCount] = useState(0);Every time you call setCount, React re-renders the component with the new state.
3. What is the useEffect hook used for?
The useEffect hook, as the name suggests, handles the side effects in React, such as fetching data, subscribing to services, and manipulating the DOM.
It has the heavy responsibility of cleaning up after every render. This saves the user from memory leakage, having duplicate API calls, and listening to the event after the component dies.
There are several variations in the syntax of useEffect depending on the parameter passed in its syntax. Let us have a look:
Run on every render:
useEffect(() => { console.log('Runs after every render'); });Run once on mount (componentDidMount):
useEffect(() => { console.log('Runs once on mount'); }, []);Run only when dependencies change:
useEffect(() => { console.log('Runs when count changes'); }, [count]);Cleanup (componentWillUnmount):
useEffect(() => { const id = setInterval(() => console.log('Tick'), 1000); return () => clearInterval(id); // cleanup }, []);4. How does useEffect compare with componentDidMount and componentDidUpdate?
Feature | useEffect (Function Component) | componentDidMount, componentDidUpdate (Class Component) |
|---|---|---|
Type | React Hook | Lifecycle methods |
Used in | Function components | Class components |
Multiple effects | Can be called multiple times | Need separate methods |
Cleanup handling | Built-in via return from the effect | Needs componentWillUnmount |
Dependencies | You control when it runs via an array | You check prevProps/prevState manually |
5. How does the useContext hook work?
This is a React hook that lets you access context values directly, without manually passing props through every level of the component tree. The main purpose of using the useContext hook is to avoid the acess to multiple nested components through prop drilling.
Basic syntax of the useContext hook:
1) Create a Context
const ThemeContext = React.createContext('light');2) Provide the Context
<ThemeContext.Provider value="dark"> <App /> </ThemeContext.Provider>3) Consume with useContext
import { useContext } from 'react'; function Button() { const theme = useContext(ThemeContext); return <button className={theme}>Click me</button>; }6. What is the Context API, and how does it solve prop drilling?
Feature | Prop Drilling | Context API |
|---|---|---|
Setup complexity | None – just pass props | Needs createContext and Provider |
Readability | Degrades as depth increases | Clear and direct access |
Maintenance | Hard – fragile across refactors | Easier – fewer coupling points |
Performance | More controlled – only updates what’s needed | Can render many consumers unless optimized |
Ideal use case | Simple trees, 1–2 levels deep | Deep trees, repeated access to the same data |
Reusability | Poor – tightly coupled | Better – components just “listen in” |
7. What is the difference between useMemo and useCallback?
Aspect | useMemo | useCallback |
|---|---|---|
Returns | Computed value | Memoized function reference |
Input | Callback function that returns a value | Callback function to memoize |
Optimization target | Value recomputation | Function recreation |
Primary use case | Heavy computation, derived state | Stable callback references for memoized components |
Signature | useMemo(fn, deps) | useCallback(fn, deps) |
8. When would you use React.memo?
React.memo() is a higher-order component that memoizes a functional component, preventing it from re-rendering unless props change.
9. How do you fetch data in React using hooks?
The combination of useEffect and useState hooks is used for side effects like data fetching and storing the responses.
useEffect(() => {
  fetch('https://api.example.com/data')
    .then(res => res.json())
    .then(data => setData(data))
    .catch(error => setError(error));
}, []);
10. What are higher-order components (HOC)?
HOC, Higher Order component, is an advanced pattern that is derived from React's compositional nature. It is a function that takes a component as input and returns a new enhanced component with some additional behavior, logic, and props attached.
import React from 'react';

// Step 1: A simple component
const Hello = (props) => {
  return <h2>{props.message}</h2>;
};

// Step 2: Higher-Order Component
const withMessage = (Component) => {
  return (props) => {
    return <Component {...props} message="Hello from HOC!" />;
  };
};

// Step 3: Wrap the component using HOC
const EnhancedHello = withMessage(Hello);

// Step 4: Use it in App
function App() {
  return <EnhancedHello />;
}

export default App;
11. What is the render props pattern?
When there is a need to share code between components using a prop, the whole value is a function; in that case Render Props pattern is used. One component passes the data to another using a prop, which is a function. Instead of directly rendering the content, the component calls this function and passes its data as arguments. For instance, you share a pencil with your friend, but you let them decide how to use it.
Component A has some state or functionality
Component A takes a function as a prop (often called "render" but can be any name)
Component A calls this function and passes its data to it
The parent component provides this function, deciding what to do with the data
Partner with Angular Minds, the leading React development company, to hire top-tier talent and deliver end-to-end product development aligned with your business goals. Whether you're scaling your team or building from scratch, we bring precision and expertise every step of the way.
12. What are portals, and how are they used in React?
Portals in React are a gateway to appear somewhere else on the web page magically. When you build a React component, it shows up where you place it. When you need a component to appear in a different place on screen, be it a floating message or a notification.
This lets your child component render to a different DOM element, called the model root.
ReactDOM.createPortal(
  <div className="modal">I appear outside my parent!</div>,
  document.getElementById('modal-root')
);
13. How do you handle errors in React applications?
Try/catch blocks for synchronous code
Promise catch() for asynchronous operations
Error boundaries for UI errors
Global error handlers for unhandled exceptions
Error logging services for production monitoring
14. What are error boundaries?
Error boundaries serve the purpose of catching JavaScript errors in both stateful and stateless components during rendering, lifecycle methods, or constructors. Error boundaries in React are components that catch JavaScript errors in their child component trees and display a fallback UI.
15. What are the limitations of props in deeply nested components?
Limitations of using props inside deeply nested components in React:
Prop drilling (passing props through multiple intermediate components)
Difficulty tracking data flow in complex component hierarchies
Performance issues when updating deeply nested components
Hard-to-maintain code as the application grows
Difficulty in refactoring component structures
16. What is lazy loading in React?
Lazy loading is a performance optimization technique for rendering components only when needed, rather than loading everything in one go, especially in large web applications and when developing with react native. React's lazy and Suspense help you to perform the same.
Syntax:
const LazyComponent = React.lazy(() => import('./Component'));Example:
import React, { Suspense } from 'react';

// Instead of regular import
// import ExpensiveComponent from './ExpensiveComponent';

// Use lazy loading
const ExpensiveComponent = React.lazy(() => import('./ExpensiveComponent'));

function App() {
  return (
    <div>
      <h1>My App</h1>
      <Suspense fallback={<div>Loading...</div>}>
        <ExpensiveComponent />
      </Suspense>
    </div>
  );
}
17. What is code splitting, and how do you implement it?
Code splitting helps to improve loading time by splitting the code into smaller chunks that can be loaded on demand. Code splitting refers to breaking your code into smaller chunks that load on demand. Implementation methods include:
// Using dynamic imports with React.lazy
const OtherComponent = React.lazy(() => import('./OtherComponent'));

// Usage with Suspense
function MyComponent() {
  return (
    <React.Suspense fallback={<div>Loading...</div>}>
      <OtherComponent />
    </React.Suspense>
  );
}
18. What is React Suspense, and how does it work?
React Suspense lets a component "wait" for something before rendering it. It is used to keep the user engaged with the user interface till the actual component gets rendered. The fallback UI is displayed during the wait.
To get a detailed overview of React Suspense, consider reading the React Suspense blog!
19. How does server-side rendering (SSR) work in React?
Server-side rendering (SSR) in React means rendering React components on the server instead of the browser. When a user requests a page, the server generates the full HTML of the page and sends it to the client. This allows the content to be visible immediately without waiting for JavaScript to load and run, improving performance and SEO. Frameworks like Next.js make SSR easy by automatically handling the rendering process and providing server-side data fetching methods
20. What is hydration in React?
Hydration is React making a server-rendered HTML page interactive by attaching JavaScript behavior. The process that takes place in SSR setups where React attaches event listeners to server-rendered HTML.
Visual Example:
Before Hydration:
<button>Click me</button>
<!-- You can see it, but it doesn't work -->
After Hydration:
<button onClick={() => alert("Clicked!")}>Click me</button>
<!-- Now it works -->
21. How does React Router help in navigation, and how do you implement it in a React application?
React Router is a standard library that is used in React to handle navigation and routing between different components without reloading the page. It enables single-page applications (SPA) to update the URL and render the corresponding component dynamically.
To implement React Router, you need to install the react-router-dom package, wrap your app inside a <BrowserRouter>, and define individual <Route> components for each page or view. Features like dynamic routing, nested routes, route parameters, redirects, and protected routes are easily handled using React Router.
Advanced Hooks & Patterns
1. What are custom hooks, and how do you design one with parameters?
This feature of React allows you to extract component logic into reusable functions, often utilizing pure functions for better consistency. Instead of writing the same logic for several pure components, one can create a custom hook to encapsulate the logic and return the necessary data and loading state.
Start the name of the hook with "use" (useCounter, useFetcher, etc.)
Custom hooks can call other hooks inside them
These are reusable JavaScript functions
import { useState } from 'react';

function useCounter(initialValue = 0) {
  const [count, setCount] = useState(initialValue);

  const increment = () => {
    setCount(prevCount => prevCount + 1);
  };

  const decrement = () => {
    setCount(prevCount => prevCount - 1);
  };

  const reset = () => {
    setCount(initialValue);
  };

  return { count, increment, decrement, reset };
}

function MyComponent() {
  const { count, increment, decrement, reset } = useCounter(10);

  return (
    <div>
      <p>Count: {count}</p>
      <button onClick={increment}>Increment</button>
      <button onClick={decrement}>Decrement</button>
      <button onClick={reset}>Reset</button>
    </div>
  );
}

function AnotherComponent() {
  const { count, increment, decrement } = useCounter(5);

  return (
    <div>
      <h2>Another Counter</h2>
      <p>Count: {count}</p>
      <button onClick={increment}>Increase</button>
      <button onClick={decrement}>Decrease</button>
    </div>
  );
}
2. How does useRef differ from useState, and when should you use it?
The useRef is used to access DOM elements directly and store mutable values that do not trigger re-renders.
The useState is used for managing states that update the UI after every change. Essential for making UI dynamic.
Feature | useState | useRef |
|---|---|---|
Triggers Re-render | Yes | No |
Used for | State that affects UI | Mutable values or DOM element references |
Return Type | State and setter function | Mutable .current property |
Best For | Dynamic, UI-changing data (e.g., form inputs, counters) | Storing values that persist but don’t affect UI (e.g., timers, DOM refs) |
3. How do you handle debouncing or throttling inside custom hooks?
Debouncing is a way to delay running a function until the user stops doing something. The pause taken while you type in the search box should not make an API call every single time a letter is pressed; in that case, you would want to wait until the user is typing.
Throttling, on the other hand, is when you run the function at most once every X milliseconds, no matter how often it gets triggered. So here we are, not waiting for a pause but putting limitations on how often something is happening.
4. What are stale closures in hooks, and how do you prevent them?
Stale closures take place when a function inside a hook remembers the past variables even after the last render has been finished. This results in chaos or bugs. To prevent it:
Include needed variables in the dependency array of useEffect or useCallback
Use the functional update form in setState
We are supposed to ensure that the function always gets the latest value, not the one stuck in memory.
5. How would you memoize expensive computations using useMemo?
The useMemo helps you save the result of a heavy calculation so it doesn’t run again unless needed. It only re-computes when its dependencies change.
Example:
const expensiveValue = useMemo(() => computeHeavy(data), [data]);This improves performance by skipping unnecessary recalculations on every render.
6. Explain useReducer and its advantages over useState in complex apps.
The useReducer hook is used to manage complex state logic in React components rather than the useState hook. React can use hooks like useReducer for local state management, but Redux is often preferred for global state management in large applications. Reducer function is used to decide how to update the state based on actions. It returns [state, dispatch] and is ideal when useState starts to feel messy.
const initialState = { count: 0 };

function reducer(state, action) {
  switch (action.type) {
    case 'increment': return { count: state.count + 1 };
    case 'decrement': return { count: state.count - 1 };
    default: return state;
  }
}
const [state, dispatch] = useReducer(reducer, initialState);
// Usage:
<button onClick={() => dispatch({ type: 'increment' })}>+</button>
To understand this better, let us go through the syntax of the useReducer hook:
// 1. Define the initial state
const initialState = {
  // your initial values
};

// 2. Write the reducer function
function reducer(state, action) {
  switch (action.type) {
    case 'ACTION_TYPE':
      return {
        ...state,
        // updated values
      };
    default:
      return state;
  }
}

// 3. Use the hook in your component
const [state, dispatch] = useReducer(reducer, initialState);

// 4. Dispatch actions to update state
dispatch({ type: 'ACTION_TYPE', payload: value });
This is like a base recipe to suit your app's logic.
7. How do you handle async logic inside React hooks?
Async operations are often handled inside the useEffect hook. Since useEffect itself can't be async, you define an inner async function and call it inside the effect. To make useEffect async directly is illegal. You are supposed to define an async function inside the effect and invoke it. Using cleanup logic is always suggested if the effect sets timers or listeners.
useEffect(() => {
  async function fetchData() {
    try {
      const response = await fetch('https://api.example.com/data');
      const result = await response.json();
      setData(result);
    } catch (error) {
      setError(error);
    }
  }

  fetchData();
}, []);
Testing & Debugging
1. How do you test hooks independently using @testing-library/react-hooks?
To ensure that the logic of custom hooks works correctly in isolation, no matter what component they're used in, making it easier to integrate with tools like the React Testing Library. The @testing-library/react-hooks provides a clean way to do this. Now called a render hook. This wraps hooks that rely on context/providers using the wrapper option.
JavaScript
// useGreeting.js
function useGreeting(name) {
  return `Hello, ${name}!`;
}

export default useGreeting;
JavaScript
import { renderHook } from '@testing-library/react-hooks';
import useGreeting from './useGreeting';

describe('useGreeting', () => {
  it('should return a greeting with the provided name', () => {
    const { result } = renderHook(() => useGreeting('Alice'));
    expect(result.current).toBe('Hello, Alice!');
  });

  it('should return a greeting with an empty name if none is provided', () => {
    const { result } = renderHook(() => useGreeting(''));
    expect(result.current).toBe('Hello, !');
  });
});
In this tiniest example:
We still use renderHook(() => useGreeting('Alice')) to render the hook.
Since this hook doesn't have any internal state or side effects, we don't need to act or waitForNextUpdate.
result.current directly holds the return value of the hook, which is the greeting string.
We simply assert that the returned string matches our expectation.
2. How would you mock API calls in component and integration tests?
When we are expecting faster results from the tests or predictability, mocking API calls comes into the picture. This eliminates the need to rely upon the tests for availability and speed of external APIs.
*insert a relevant example here*3. What are common pitfalls when testing async components?
Not Awaiting Promises: This is probably the most frequent offender. If your component performs an asynchronous operation (like fetching data), and your test doesn't await the resolution or rejection of that promise before making assertions, your test might run too quickly and check the state before the async operation has completed. This leads to false negatives or unpredictable test behaviour.
Flaky Tests Due to Timing (Using setTimeout): Relying on fixed setTimeout delays in your tests to "wait" for asynchronous operations is a recipe for flaky tests. Different environments (your local machine, CI server) can have varying execution speeds, causing tests to pass or fail inconsistently. Use waitFor or waitForElementToBeRemoved from @testing-library/react instead, which waits for specific conditions to be met.
Incorrectly Mocking Asynchronous Operations: If your mocks for API calls or other async functions don't accurately simulate the timing or resolution/rejection behaviour of the real implementation, your tests might pass even if the component has issues in a real asynchronous scenario. Ensure your mocks resolve or reject promises correctly and after an appropriate delay if needed to mimic real-world latency.
Not Handling Loading States: Many async components have loading states. 1 It's important to test these states to ensure the user experience is as expected. Your tests should assert that the loading indicator is present while the async operation is in progress and disappears when it's complete.
Conclusion
At Angular Minds, these questions form a critical part of our rigorous interview process for React and Angular developer roles. Our goal is to ensure that every developer we hire meets high standards of technical excellence and real-world application understanding. If you are building your interview process or looking to refine your existing one, we hope this list serves as a valuable resource to identify top-tier front-end talent.

Related articles

AI Integration in React Applications: Building Intelligent UIs with TensorFlow.js and Brain.js