Directives in Angular : A Complete Guide
Brief: This blog explores the best practices for implementing form validation in Angular applications. It begins by explaining how Angular forms work, including both reactive and template-driven types. You’ll learn about various validation techniques and why using Angular forms enhances reliability and scalability. The article wraps up with key takeaways and additional resources for further learning.
What Are the Angular Directives?
The directive in Angular is a directive class with the (@) decorator. Built-in directives in Angular are like special ways that can change how HTML elements behave or look. They let you add new features to the application, like making elements appear or disappear based on conditions or changing their style. Overall, directives help you make your website more interactive and dynamic.
What Are the Types of Directives?
1. Component Directives
A component is completely a form of Component Directive, and it is a simple directive with its templates. These are like custom HTML elements that encapsulate their behavior and appearance, making them reusable components.
2. Attribute Directives
Attribute directive is used to change the appearance or behavior of an existing element, such as adding styles or handling events.
3. Structural Directives
Structural directive changes the structure of the DOM, adding or removing elements based on conditions.
4. Custom Directives
Custom Directives can also be created to add specific behaviors to elements, enhancing the functionality of an Angular application.
Process of Creating Directives
1. Component Directives
1) A component directive in Angular is just a regular directive class that has been decorated with the @Component decorator. This decorator is like a special tag that tells Angular this class is a component.
2) One of the main jobs of a component is to specify the HTML template that should be displayed when the component is used. This template defines how the component will look and what content it will display.
3) Component directives are the most commonly used type of directive in Angular projects because they allow you to create reusable and modular pieces of your web page
4) @component decorator provides additional metadata that determines how the component should be processed, instantiated, and used at runtime.
Parent Component:
@Component({
  selector: 'app-parent',
  template: `
    <h1>Parent Component</h1>
    <app-child></app-child>
`
})

export class ParentComponent { }
Child Component:
@Component({
  selector: 'app-child',
  template: `
     <h3>Child Component</h3>
  `
})

export class ChildComponent { }
Output:
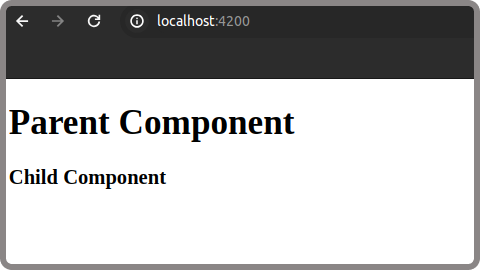
In the above example, we used <app-child></app-child> as a component directive to include and display the child component within the parent component.
2. Attribute Directives
1) Attribute directives in Angular are a type of directive that can change the appearance or behaviour of an element, component, or another directive. They are applied to HTML elements as attributes and are used to enhance the functionality of these elements.
2) These directives are commonly used to dynamically modify the style, directive class, or behaviour of an element based on certain conditions. For example, the `ngClass` directive allows you to add or remove CSS classes based on the evaluation of an expression. Similarly, the `ngStyle` directive lets you set inline styles for a host element based on the evaluation of an expression.
ngClass Example
@Component({
  selector: 'app-root',
  template: `
    	<div [ngClass]="{'text-success': isSuccess,'text-danger': !isSuccess}">
	    Text
	</div>
`
})

export class AppComponent {
  isSuccess: boolean = true;
 }
Output
In this example, the text-success class is applied when isSuccess is true, and the text-danger class is applied when isSuccess is false. The isSuccess property should be defined in your component class.
ngStyle example
@Component({
  selector: 'app-root',
  template: `
    <div
	[ngStyle]="{ 'background-color': isSuccess ? 'yellow' : 'green',
	'font-size': isSuccess ? '24px' : '20px' }">
    	This div's background color and font size change based
	on the value of isSuccess.
    </div>
`
})

export class AppComponent {
  isSuccess: boolean = true;
 }
Output
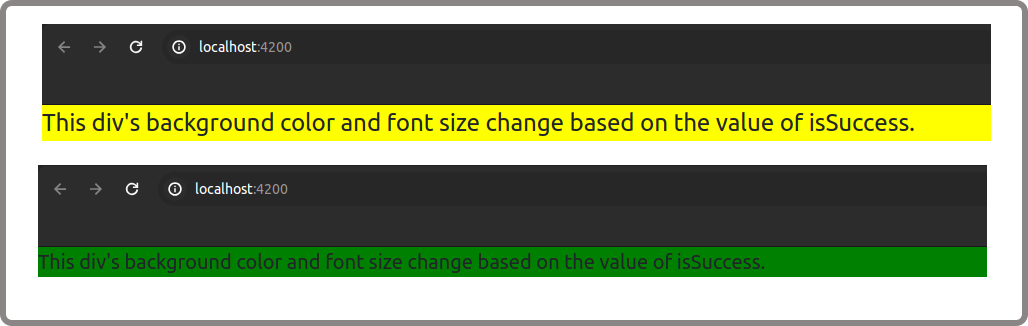
In this example, the ngStyle directive applies a background color of yellow and a font size of 24px if isSuccess is true, and green and a font size of 24px if isSuccess is false. The isSuccess property should be defined in your component class.
3. Structural Directives
1) Structural directives in Angular are special instructions that help you change the structure of your HTML layout. They can add, remove, or manipulate elements in the DOM based on certain conditions. You can easily recognize them because they start with an asterisk (*).
2) For example, `ngIf` is a structural directive that can add or remove a dom layout element from the DOM based on a condition. If the condition is true, the dom element is added to the DOM, if it's false, the element is removed.
3) `ngFor` is another structural directive that helps you display a list of items in your HTML by repeating a template for each item in the list.
4) `ngSwitch` is similar to a JavaScript switch statement. It allows you to choose one element from a set of possible elements to display based on a switch condition.
5) In simple terms, structural directives let you dynamically change what appears on your web page by adding, removing, or modifying elements in the DOM.
We Create Customizable Applications and Feature-Rich UIs.
Our Angular Development Services can ensure dynamic and interactive user interfaces that fulfil the application's and its users' specific needs.
ngIf example
@Component({
  selector: 'app-root',
  template: `
	<div *ngIf="isSuccess;">
    	  Hello!
	</div>
`
})

export class AppComponent {
  isSuccess: boolean = true;
 }
Output
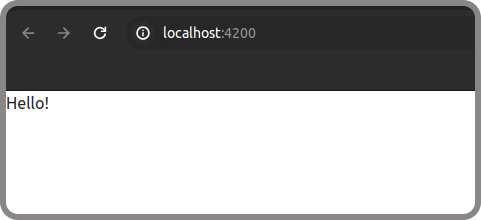
In this case, since isSuccess is set to true, the "Hello!" message will be displayed. If you change isSuccess to false nothing will be display.
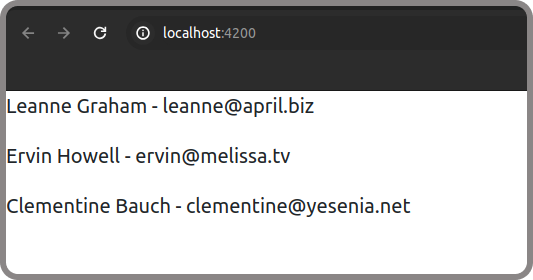
ngFor directive example:
@Component({
  selector: 'app-root',
  template: `
  <div>
    <ng-container *ngFor="let user of users">
        <p>
             {{ user.name }} - {{ user.email }}
        </p>
    </ng-container>
  </div>

`
})

export class AppComponent {
   users = [
    { "id": 1, "name": "Leanne Graham", "email": "leanne@april.biz" },
    { "id": 2, "name": "Ervin Howell", "email": "ervin@melissa.tv" },
    { "id": 3, "name": "Clementine Bauch", "email": "clementine@yesenia.net"},
  ];
 }
Output:
NgSwitch
@Component({
  selector: 'app-root',
  template: `
	<div [ngSwitch]="color">
    	   <div *ngSwitchCase="'red'">Red color is selected</div>
    	   <div *ngSwitchCase="'blue'">Blue color is selected</div>
    	   <div *ngSwitchCase="'green'">Green color is selected</div>
    	   <div *ngSwitchDefault>No color is selected</div>
  	</div>
`
})

export class AppComponent {
   color: string = 'green';
 }
In this example, since the color is set to 'green', the message "Green color is selected" will be displayed. If you change the color to 'red' or 'blue', the corresponding message will be displayed instead. If the color is set to a value that is not 'red', 'blue', or 'green', the message "No color is selected" will be displayed as the default case.
4. Custom Directives
i) Custom directives in Angular are directives that developers can create according to their requirements. These directives can either change the appearance or behaviour of elements in your web app.
ii) For example, you could create a custom directive called `myHighlight` that makes text change colour when you hover over it. This would be an attribute selector directive because it changes how an element looks.
iii) These custom directives help keep your code organised and easier to understand by encapsulating complex logic into reusable chunks.
ng generate directive my-highlightThis will create a new directive file my-highlight.directive.ts and add it to the declarations array in your module file (app.module.ts).
my-highlight.directive.ts
import { Directive, ElementRef, HostListener } from '@angular/core';

@Directive({
  selector: '[appMyHighlight]'
})
export class MyHighlightDirective {

  constructor(private el: ElementRef) { }

  @HostListener('mouseenter') onMouseEnter() {
    this.highlight('yellow');
  }

  @HostListener('mouseleave') onMouseLeave() {
    this.highlight(null);
  }

  private highlight(color: string | null) {
    this.el.nativeElement.style.backgroundColor = color;
  }
}
app.component.ts
@Component({
selector: 'app-root',
template: `
	<p appMyHighlight>
    	    Hover over this text to see it highlighted.
	</p>
`
})

export class AppComponent { }
Output
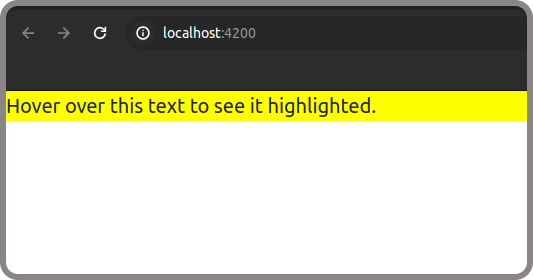
Now, when you hover over the paragraph element, the background color will change to yellow.
Conclusion
Directives are a fundamental part of building dynamic and interactive web applications in Angular. They are like special instructions that you can use to manipulate the Document Object Model (DOM), control the rendering of elements, and encapsulate reusable behavior. By understanding and effectively using directives, you can create more maintainable and flexible Angular applications. They help you write cleaner code by encapsulating complex logic into reusable directives, making your code easier to understand and maintain. So, whether you're building a simple website or a complex web application, Angular attribute directives are a powerful tool that can help you create dynamic, interactive, and maintainable Angular applications.
FAQ's

Related articles