Creating Custom Directives in Angular: Step-by-Step Tutorial
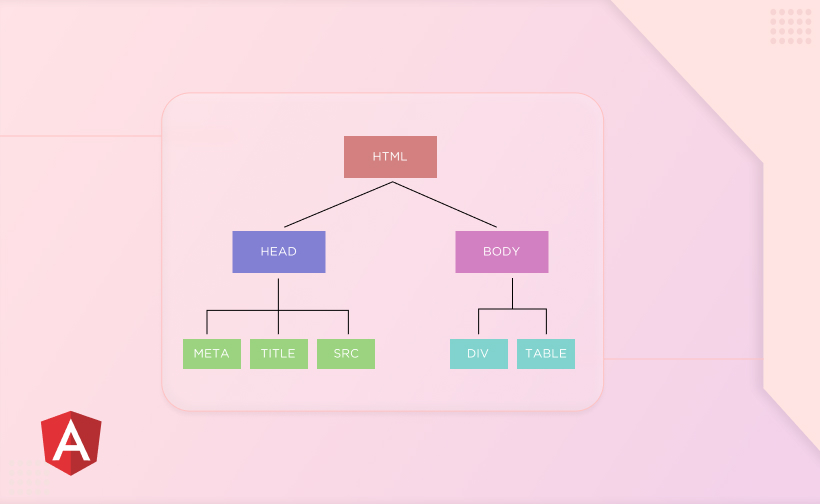
Table of Contents
1. Introduction
2. Types of Angular Directives
3. Creating Custom Directives in Angular
4. Conclusion
Brief - This blog covers an easy-to-follow tutorial on creating custom directives in Angular. Get a clear understanding of the different types of Angular directives, like component, structural, and attribute. Additionally, we'll demonstrate how to enhance your applications by utilizing custom attribute directives. This approach boosts modularity and makes your code more reusable.
Introduction
Angular directives play a very important part in developing applications. Angular directives are nothing but classes associated with the @Directive decorator. These directives in angular are used to modify the behavior and structure of the DOM layout and component data model.
These directives are mainly classified into two categories, viz. Built-in and custom directives. Some examples of built-in directives are ngIf, ngStyle, ngSwitchCase, etc. Further, ngSwitchCase is used with ngSwitch directive. Now, these directives are useful in various scenarios.
To use built-in directives, we must import the corresponding directive or the Common Module which contains all the built-in directives. For example, if we want to use the ngIf directive, then in our ngModule's import option, add the ngIf directive or add the CommonModule class.
Types of Angular Directives (built-in)
As we discussed above, directives can mainly be classified into two categories, i.e. built-in and custom directives. Further, built-in directives are divided into three sub-categories. Those categories are listed below.
Component Directive
Structural Directive
Attribute Directive
1. Component Directive
Angular provides a special type of directive, which is a component directive. As discussed above, the directive class is always associated with @Directive decorator. But, in the case of the component directive, the class has the @Component directive.
These types of directives are used to specify HTML elements for the DOM layout. These component directives include a template inside them, which is rendered in the web browser.
As we must not forget that in angular, components are subsets of other directives too. It means the @Component decorator inherits the @Directive decorator.
Because of this, some options like selector, templateUrls, etc. can be seen in the component decorator also. The @Component decorator inherits the properties of the @Directive decorator.
selector
This property is used to identify the component and load it into the HTML template. Angular uses the selector's value as an HTML tag. For example, if the selector's value is 'app-demo' then it will be used like <app-demo></app-demo> in the template in order to load this component.
templateUrl
This property contains the path of html file for the component.
template
In case we don't want an external file for the template, then we can write our HTML inside this property.
styleUrls
It contains all CSS stylesheet files to decorate container element and the associated template. We can add multiple files for our component. This property takes a value as an array of strings.
The following example shows the component directive with various decorator's properties.
//demo.component.ts

import { Component } from '@angular/core';
@Component({
  selector: 'app-demo',
  template: `<h1>This is the demo component.</h1>`,
  styleUrls: ['./demo.component.css']
})
export class DemoComponent {

}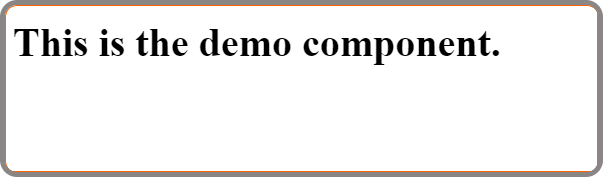
Here, the 'app-demo' is a selector for our component, by using that we can have direct access to the component's template and its logic inside the class. For the template property, we have provided some HTML, which is rendered at the place of the <app-demo></app-demo>. Further for styling, the file demo.component.css has been mentioned to style our template.
Thus, our component is ready to use, but we are supposed to declare the component in the declaration array of @ngModule's import property. By doing so, we can access it inside that module.
2. Structural Directive
Structural directives are used to modify the structure of the DOM by adding or removing the HTML elements inside our template. Angular provides various built-in structural directives that are used to modify the structure of existing element in our DOM. These structural directives include ngIf, ngFor, ngSwitch, etc. Each one of these directives has a prefix, which is '*'.
Below, we will discuss the ngIf and ngFor directives.
i) *ngIf
This directive is used at the time when we want to render the HTML element or template on specific conditions. If the provided condition is true, then the particular HTML element on which this directive is applied will be rendered inside the DOM.
If the condition is false, the same HTML element will not be rendered inside the DOM.
The following example shows the working of the *ngIf directive.
//demo.conponent.ts

import { Component } from '@angular/core';
@Component({
  selector: 'app-demo',
  template: `
  	<button (click)="condition=!condition">Click</button>
  	<br><br>
	<div *ngIf="condition">
   	  If 'condition' is true, then this box is render in DOM
	</div>`,

  styles : `
  	div {
    		border : 1px solid black;
    		padding : 5px;
  	    }`,
})
export class DemoComponent {
  condition : boolean = true;
}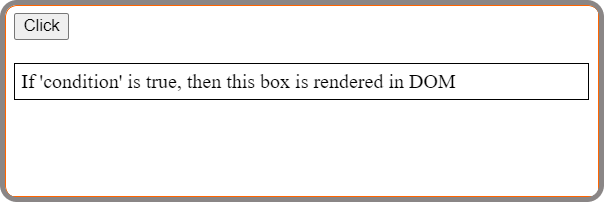
From above code snippets, as the value of condition is 'true', the div HTML element is rendered in the DOM. As soon as we click on the button, the value of condition becomes 'false' and thus, the div HTML element is removed from the DOM.
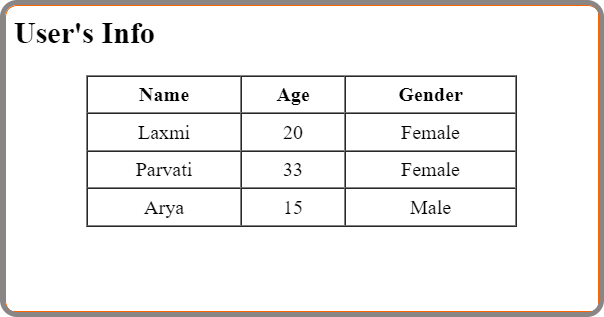
ii) *ngFor
This directive is used to iterate over the variables whose type is array. The below example shows the working function of this directive.
The following example shows the working of the *ngFor directive.
//demo.conponent.ts

import { Component } from '@angular/core';
@Component({
  selector : 'demo-component',
  template : `
	<h2>User's Info</h2>
	<table cellpadding="5px" border="1" cellspacing="0px">
  	    <tr>
    		<th>Name</th>
    		<th>Age</th>
    		<th>Gender</th>
  	    </tr>
  	    <tr *ngFor="let user of users">
    		<td>{{ user.name }}</td>
    		<td>{{ user.age }}</td>
    		<td>{{ user.gender }}</td>
  	    </tr>
	</table>`,

  styles : `
	table {
    		width : 75%;
    		margin:auto;
    		text-align:center;
  	}`
})
export class DemoComponent {
  users : any[] = [
    { name: 'Laxmi', age: '20', gender: 'Female' },
    { name: 'Parvati', age: '33', gender: 'Female' },
    { name: 'Arya', age: '15', gender: 'Male' },
  ];
}
3. Attribute Directive
Attribute directives are used to change the appearance and behavior of DOM elements. There are several attribute directives provided by angular such as ngClass, ngStyle, ngModel, etc.
There are many attribute directives, these three are explained below as they are used mostly throughout the development of an angular application.
i) ngClass
This directive is used to add the list of CSS classes to the html element dynamically. The code snippet below shows the working function of this directive.
The following example shows the working of the ngClass directive.
//demo.component.ts

import { Component } from '@angular/core';
@Component({
  selector : 'app-demo',
  template : `
	<button (click)="condition= !condition">Click</button>
	<br><br>
	<div [ngClass]="{ 'change-background' : condition,
                          'change-color' : !condition
                        }">
  		div For ngClass Directive
	</div>`,
  styleUrls : ['./demo.component.css']
})
export class DemoComponent {
  condition: boolean = true;
}
//demo.component.css
.change-background {
background: red;
}
.change-color {
color: green;
}
From the above code snippets, we have used the ngClass attribute directive that adds the two CSS classes viz. 'change-background' and 'change-color' dynamically on the div html element.
When the condition variable is set to true, then the 'change-background' class is appended to the div element, and when the variable is false, the 'change-color' class is appended to that div Element.
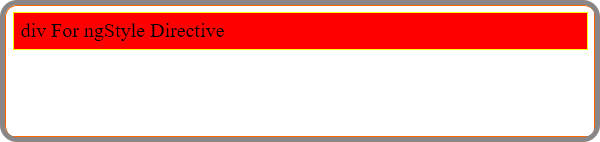
ii) ngStyle
This directive is used to set the style of our DOM elements. We can add multiple style properties at one time on the div element.
The following example shows the working of the ngStyle directive.
//demo.component.ts

import { Component } from '@angular/core';
@Component({
  selector : 'app-demo',
  template : `
	<div [ngStyle]="{
                'background':'red',
                'color':'black',
                'border':'1px solid yellow'
               }"> div For ngStyle Directive
	</div>`
})
export class DemoComponent {
}
ii) ngModel
This directive is used on the HTML input elements to perform the two-way data binding. The ngModel directive is a part of the FormsModule module.
The meaning of two-way data binding is that the data in the data model gets reflected in the template input variable when the input value changes and vice-versa.
This directive internally uses the property binding as well as event binding to perform the two-way data binding. The delimiter for two-way data binding is [(ngModel)].
The following example shows the working of the ngModel directive.
//demo.component.ts

import { Component } from '@angular/core';
@Component({
  selector : 'app-demo',
  template : `
	<button (click)="changeName()">Change Name</button>
  	<br><br>
	<input name="First Name" [(ngModel)]="firstName" />
	<br><br>
  	<span>Value : <b>{{firstName }}</b></span>`
})
export class DemoComponent {
  firstName : string = 'Rutu';
  changeName() : string {
    this.firstName = 'Rutuparn';
  }
}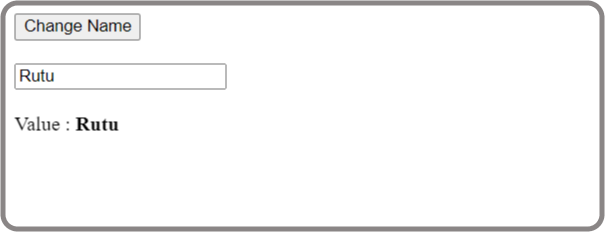
In the above example, we have applied the ngModel directive on the input field. By doing so, we have bind the value of variable 'firstName' with that input element. As soon as the input field's value changes, the same changes can be detected in the value of variable 'firstName' and vice-versa.
Incorporate the Modular Design and Code Reusability in your Angular Web Application
We are an Angular development company specializing in building Angular web applications with Angular directive benefits.
Creating Custom Directives in Angular
As we discussed above, angular directive plays a very important role in developing angular applications. Now, the built-in directives are limited to use as they mostly provide basic functionalities. To go robust, angular allows us to create our own directives.
The thing is that we are not able to create our own structural directive, but our own attribute directive. Just like angular component, angular directive too has lifecycle hook method/s.
Plenty of functionalities can be achieved through this attribute directive. For example, we can provide the functionality of a hover event on a DOM element, also we can listen to various DOM event/s, etc.
1) Use of angular CLI to create a custom directive
In order to create our own attribute directive, we should use the angular CLI.
The command for the same is "ng generate d <directive-name>".
2) What happens after executing the above command?
We can see two files in the same folder where we want our own directive code to be at. One of these files includes a ts file and a spec file.
The ts file contains our directive class. Inside the directive's constructor, we can have the instance of element ref and thus we can modify the existing behavior of our HTML element.
3) Rules to implement the custom directives into our application
We should always declare our directive in the module so that, all components inside that module will be able to use our directive.
In case our component is standalone, then add this directive to parent component's class in the imports property of that parent component's decorator.
4) Example: Creating a custom directive to change the color of text on clicking over the HTML element.
Step1: Create a directive using the CLI command "ng generate d custom".
Here, "custom" will be the directive name.Step 2: In the directive's constructor, we will inject the instance of the ElementRef service.
Below code snippet represents the directive class.
import { Directive, ElementRef, HostListener } from '@angular/core';

@Directive({
  selector: '[custom-directive]',
})
export class CustomDirective {
  constructor(private ele: ElementRef) {
  }

  @HostListener('click') onClick() {
    this.el.nativeElement.style.color = 'red';
  }

  @HostListener('mouseenter') onMousemove() {
    this.ele.nativeElement.style.color ='purple';
  }

  @HostListener('mouseout') onMousemove() {
    this.ele.nativeElement.style.color ='black';
  }
}
For the selector property, we have provided the name of the directive which is '[custom-directive]'. We should provide this attribute name on the html element where we want our directive to work upon.
ElementRef is the wrapper for the parent Dom element (the host element on which we have applied our custom directive). We can access the host element using the nativeElement attribute.
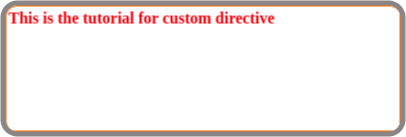
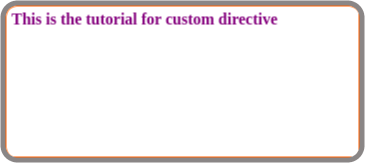
Step 3: This is the last step, in which we just have to use this directive in the required template.
//component.html

<b custom-directive>
  This is the tutorial for custom directive
</b>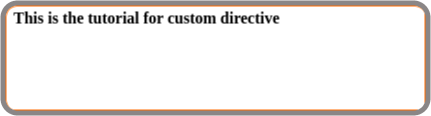
If our HTML element is not clicked or not hovered, the default text color will be black here. In case a user clicks on the html element, the text color changes to red. Also, if the user hovers over the html element, the text color changes to purple.
Below image shows the same output which we discussed above.
Just like this, we can listen to every mouse event and keyboard event. The two most important decorators that we should know while working with custom directives. They are mentioned below.
I. @HostListener()
This decorator is used to listen to the dom events that occur on our host element. For our example. @HostListener listens to the click event that occurs on the host element and changes the color of our element.
II. @HostBinding()
This decorator allows you to set the values for the properties of our host element.
In Summary
Angular has become a lucrative part of application development. And, it provides a special type of directives that are built-in and limited to use. So to become vigorous, angular allows us to create our own directives. Create Custom Directives in Angular to ensure reusability, and performance, and enhance user interaction.
Also Read: Directives in Angular : A Complete Guide
Faq's About Custom Directives

Related articles