Writing Your First Angular Unit Test: Step-by-Step Tutorial

Brief - A complete beginner-friendly guide to writing Angular unit tests. Covers testing components, using Jasmine & Karma, mocking services, spying, handling async code, and boosting code coverage, all with best practices.
Angular unit testing is the process of testing Angular applications to ensure that they work in the desired manner and to get optimum solutions. Testing in an Angular project typically involves writing and running various types of tests to verify the functionality, performance, and reliability of Angular components.
we can also test services, directives, pipes, and other parts of the application using angular testing. Integration testing angular applications to test frameworks ensures desired results.
Significance of Angular Testing
There are several reasons why Angular testing is important and widely used:
Maintaining Quality: Testing helps ensure that the application works as intended and meets the quality standards. By catching bugs and issues early in the development process, testing contributes to delivering a more reliable and stable product.
Regression Testing: As the application evolves and new features are added, there's a risk of introducing regressions—unintended changes that affect existing functionality. Automated tests can quickly detect such regressions, allowing developers to fix them promptly.
Refactoring Support: When refactoring code or making changes to the application structure, tests act as a safety net. They provide confidence that the changes haven't broken existing functionality.
Documentation and Specification: Tests serve as a form of documentation, illustrating a basic understanding of how different parts of the application should behave. They also serve as a specification for the expected behavior of the application.
Facilitating Collaboration: Testing encourages good development practices such as writing modular and testable code. It also facilitates collaboration among team members by writing tests, providing a common understanding of the application's behavior, and ensuring consistency in code quality.
Angular applications are typically tested using tools like Jasmine and Karma for unit testing, Protractor for end-to-end testing, and TestBed for integration testing. These tools help developers write and run tests efficiently, covering various aspects of the application's functionality.
What is Unit Testing Angular?
Unit testing is a software development process in which it divides your application into smaller parts called units are checked individually and scrutinized for proper operations and user behavior.
Unit testing is important for all such tests ensuring proper functionality of application, bug detection, improved code quality, faster debugging, and security vulnerabilities.
When using writing code as a unit of integration tests, in angular it is recommended to use the AAA (Arrange, Act, Assert) process.

Arrange
it involves arranging data from selected test groups or environments for testing.
Act
it involves performing actual logic on arranged data.
Assert
it involves the verification of test results.
The below code shows a simple example of the AAA process
multiply(firstNumber:number,secondNumber:number):number{
	return firstNumber * secondNumber;
};

// initial test script file (.spec.ts)
it("should test multiplication of number",()=>{
	// Arrange
	let firstNumber = 10;
	let secondNumber = 10;

	// Act
	let result = multiply(firstNumber,secondNumber);

	//Assert
	expect(result).toBe(100);
})
Angular uses Jasmine and Karma for unit testing purposes.
What are karma and jasmine in angular testing?

Jasmine :
jasmine is a behavior-driven development (BDD) testing framework. It provides a test suite and helps you to write unit test cases in a human-readable format. You simply write test cases for your code to achieve a requirement.
Karma :
karma is a test runner that runs test cases that are written by using the Jasmine framework. It provides some features like code coverage, live reloading test files, and integration with continuous integration (CI) tools.
Writing First Angular Unit Test
To write unit test cases we need a .spec.ts file. There are two ways to create a .spec test file extension is, we can create it by using angular cli or we can create our own test file with extension .spec.ts. Generally angular creates this file for you by default unless we tell the angular to don't create this file. When the spec.ts file is created by angular it provides us the basic skeleton of test cases.
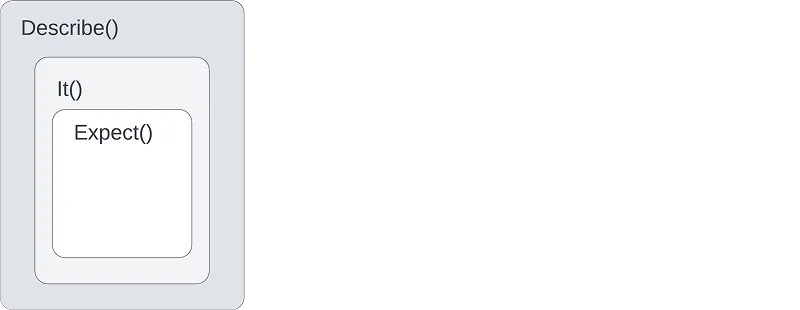
Describe
Describe the block used to create a group of test cases. It has two arguments first one is the identifier or name of the first test case and the second one is a function that contains test cases.
It
It block is used to write individual test cases for each functionality. It also has two arguments identifier or name of the test case and function which contains assertion.
Expect
It is used to create expectations. It takes a single value and a matcher function which tests the value against the expected value.
Let's take a basic example of unit testing
import { Component } from '@angular/core';

@Component({
  selector: 'app-root',
  templateUrl: './app.component.html',
  styleUrls: ['./app.component.scss'],
})
export class AppComponent{
	title = "App";
	getTitle(){
		return this.title;
	}
}
// app.component.spec.ts test file
import { TestBed } from '@angular/core/testing';
import { RouterTestingModule } from '@angular/router/testing';
import { AppComponent } from './app.component';
describe('AppComponent', () => {
beforeEach(() => TestBed.configureTestingModule({
imports: [RouterTestingModule],
declarations: [AppComponent]
}));
it(`should return app title`, () => {
const fixture = TestBed.createComponent(AppComponent);
const app = fixture.componentInstance;
let result = app.getTitle();
expect(result).toEqual('App');
});
});Code Interpretation
In the above code example, we have tested the getTitle() function which returns the title of the app. First, we created a describe container that denotes a group of test cases that belong to "AppComponent". Next, we created it block which is used to test the getTitle() function and finally, we added an assertion to test file name to verify the result.
We can run these test cases by using the following command or the "ng test" command.
npm run testDid you notice that we have used TestBed and what is the use of TestBed?
Angular testing package includes testBed class which is a utility that provides a configured environment for testing angular applications. It includes all necessary components other than test frameworks and a configuration file is required for testing the system. Tests are performed by providing data and evaluating results to ensure correct results. Thus, TestBed provides a controlled environment to identify defects, improve quality, and achieve requirements.
TestBed provides some methods that are useful while testing functionality. One of those is TestBed.configureTestingModule() is used to configure the testing module before running test cases in an angular application. TestBed.createComponent() which is used to create angular component instances.
class TestBed {
  platform: PlatformRef;
  ngModule: Type<any> | Type<any>[];
  initTestEnvironment(
    ngModule: Type<any> | Type<any>[],
    platform: PlatformRef,
    options?: TestEnvironmentOptions
  ): void;
  resetTestEnvironment(): void;
  resetTestingModule(): TestBed;
  configureCompiler(config: { providers?: any[]; useJit?: boolean }): void;
  configureTestingModule(moduleDef: TestModuleMetadata): TestBed;
  compileComponents(): Promise<any>;
  inject<T>(
    token: ProviderToken<T>,
    notFoundValue: undefined,
    options: InjectOptions & { optional?: false }
  ): T;
  inject<T>(
    token: ProviderToken<T>,
    notFoundValue: null,
    options: InjectOptions
  ): T | null;
  inject<T>(
    token: ProviderToken<T>,
    notFoundValue?: T,
    options?: InjectOptions
  ): T;
  inject<T>(token: ProviderToken<T>, notFoundValue?: T, flags?: InjectFlags): T;
  inject<T>(
    token: ProviderToken<T>,
    notFoundValue: null,
    flags?: InjectFlags
  ): T | null;
  get<T>(token: ProviderToken<T>, notFoundValue?: T, flags?: InjectFlags): any;
  get(token: any, notFoundValue?: any): any;
  runInInjectionContext<T>(fn: () => T): T;
  execute(tokens: any[], fn: Function, context?: any): any;
  overrideModule(
    ngModule: Type<any>,
    override: MetadataOverride<NgModule>
  ): TestBed;
  overrideComponent(
    component: Type<any>,
    override: MetadataOverride<Component>
  ): TestBed;
  overrideDirective(
    directive: Type<any>,
    override: MetadataOverride<Directive>
  ): TestBed;
  overridePipe(pipe: Type<any>, override: MetadataOverride<Pipe>): TestBed;
  overrideTemplate(component: Type<any>, template: string): TestBed;
  overrideProvider(
    token: any,
    provider: { useFactory: Function; deps: any[]; multi?: boolean }
  ): TestBed;
  overrideProvider(
    token: any,
    provider: { useValue: any; multi?: boolean }
  ): TestBed;
  overrideProvider(
    token: any,
    provider: {
      useFactory?: Function;
      useValue?: any;
      deps?: any[];
      multi?: boolean;
    }
  ): TestBed;
  overrideTemplateUsingTestingModule(
    component: Type<any>,
    template: string
  ): TestBed;
  createComponent<T>(component: Type<T>): ComponentFixture<T>;
  flushEffects(): void;
}
Jasmine Tests
Jasmine provides some methods that are used to avoid repetition those are
beforeEach: It runs before each test case.
afterEach: It runs after each test case
beforeAll: It runs before all test cases.
afterAll: It runs after all test cases tests run.
Inculcate Early Bug Detection and Faster Development Cycles
Angular Minds, an Angular Web Application Development Company can provide comprehensive Angular Unit Testing for your next project.
Mocking
Mocking is nothing but a complete replacement of a real object, it looks like a dependency but we can control it.
Please refer below code to know how mocking works:
import { Component } from '@angular/core';
import { ProductsService } from "./products.service";
@Component({
  selector: 'app-root',
  templateUrl: './app.component.html',
  styleUrls: ['./app.component.scss'],
})
export class AppComponent{
	products = [];
	constructor(private productsService:ProductsService){}
	getProducts(){
		productsService.getProducts().subscribe((res)=>{
		this.products = res;
	})
    }
}
// app.component.spec.ts test file
import { TestBed } from '@angular/core/testing';
import { RouterTestingModule } from '@angular/router/testing';
import { AppComponent } from './app.component';
import { ComponentFixture, TestBed, fakeAsync, tick } from '@angular/core/testing';
import { HttpClientModule } from '@angular/common/http';
import { ProductService } from "./product.service";
import { of } from 'rxjs';
// providing mock implementation
class MockProductService {
getProducts() {
const mockProducts = [
{ id: 1, name: 'Product 1' },
{ id: 2, name: 'Product 2' },
// Add more mock products as needed
];
return of(mockProducts);
}
}
describe('AppComponent', () => {
let component: AppComponent;
let fixture: ComponentFixture<AppComponent>;
let productService: ProductService;
beforeEach(fakeAsync(() => {
TestBed.configureTestingModule({
declarations: [AppComponent],
imports: [HttpClientModule],
providers: [
{ provide: ProductService, useClass: MockProductService }
]
}).compileComponents();
}));
beforeEach(() => {
fixture = TestBed.createComponent(AppComponent);
component = fixture.componentInstance;
productService = TestBed.inject(ProductService);
});
it('should retrieve products', fakeAsync(() => {
component.getProducts();
tick();
expect(component.products).toEqual([
{ id: 1, name: 'Product 1' },
{ id: 2, name: 'Product 2' }
]);
}));
});In the above example, we have created the mock implementation of the products service which contains the getProducts() function and returns the products array. We provided a MockProductService instead of an actual product service.
Spy
Spy is a feature of Jasmine that allows you to take a control of class, function, or object and modify the behavior in such a way as you want.
Please refer below code to understand how spy works:
// app.component.ts
import { Component } from '@angular/core';
import { ProductsService } from "./products.service";
@Component({
  selector: 'app-root',
  templateUrl: './app.component.html',
  styleUrls: ['./app.component.scss'],
})
export class AppComponent{
	products = [];
	constructor(private productsService:ProductsService){}
	getProducts(){
		productsService.getProducts().subscribe((res)=>{
		this.products = res;
	})
    }
}
// app.component.spec.ts test file
import { ComponentFixture, TestBed, fakeAsync, tick } from '@angular/core/testing';
import { HttpClientModule } from '@angular/common/http';
import { AppComponent } from './app.component';
import { ProductService } from './product.service';
import { of } from 'rxjs';
describe('AppComponent', () => {
let component: AppComponent;
let fixture: ComponentFixture<AppComponent>;
let productService: ProductService;
beforeEach(fakeAsync(() => {
TestBed.configureTestingModule({
declarations: [AppComponent],
imports: [HttpClientModule],
providers: [ProductService]
}).compileComponents();
productService = TestBed.inject(ProductService);
}));
beforeEach(() => {
fixture = TestBed.createComponent(AppComponent);
component = fixture.componentInstance;
});
it('should retrieve products', fakeAsync(() => {
// Create a spy on the getProducts method of the ProductService
const mockProducts = [
{ id: 1, name: 'Product 1' },
{ id: 2, name: 'Product 2' }
]
const productServiceSpy = spyOn(productService, 'getProducts').and.returnValue(of(mockProducts));
// Call the getProducts method of the component
component.getProducts();
// Use tick() to simulate the passage of time until all asynchronous operations are completed
tick();
// Now you can assert that the component's products property has been updated
expect(component.products).toEqual(mockProducts);
// Verify that the getProducts method of the ProductService was called
expect(productServiceSpy).toHaveBeenCalled();
}));
});Testing asynchronous code
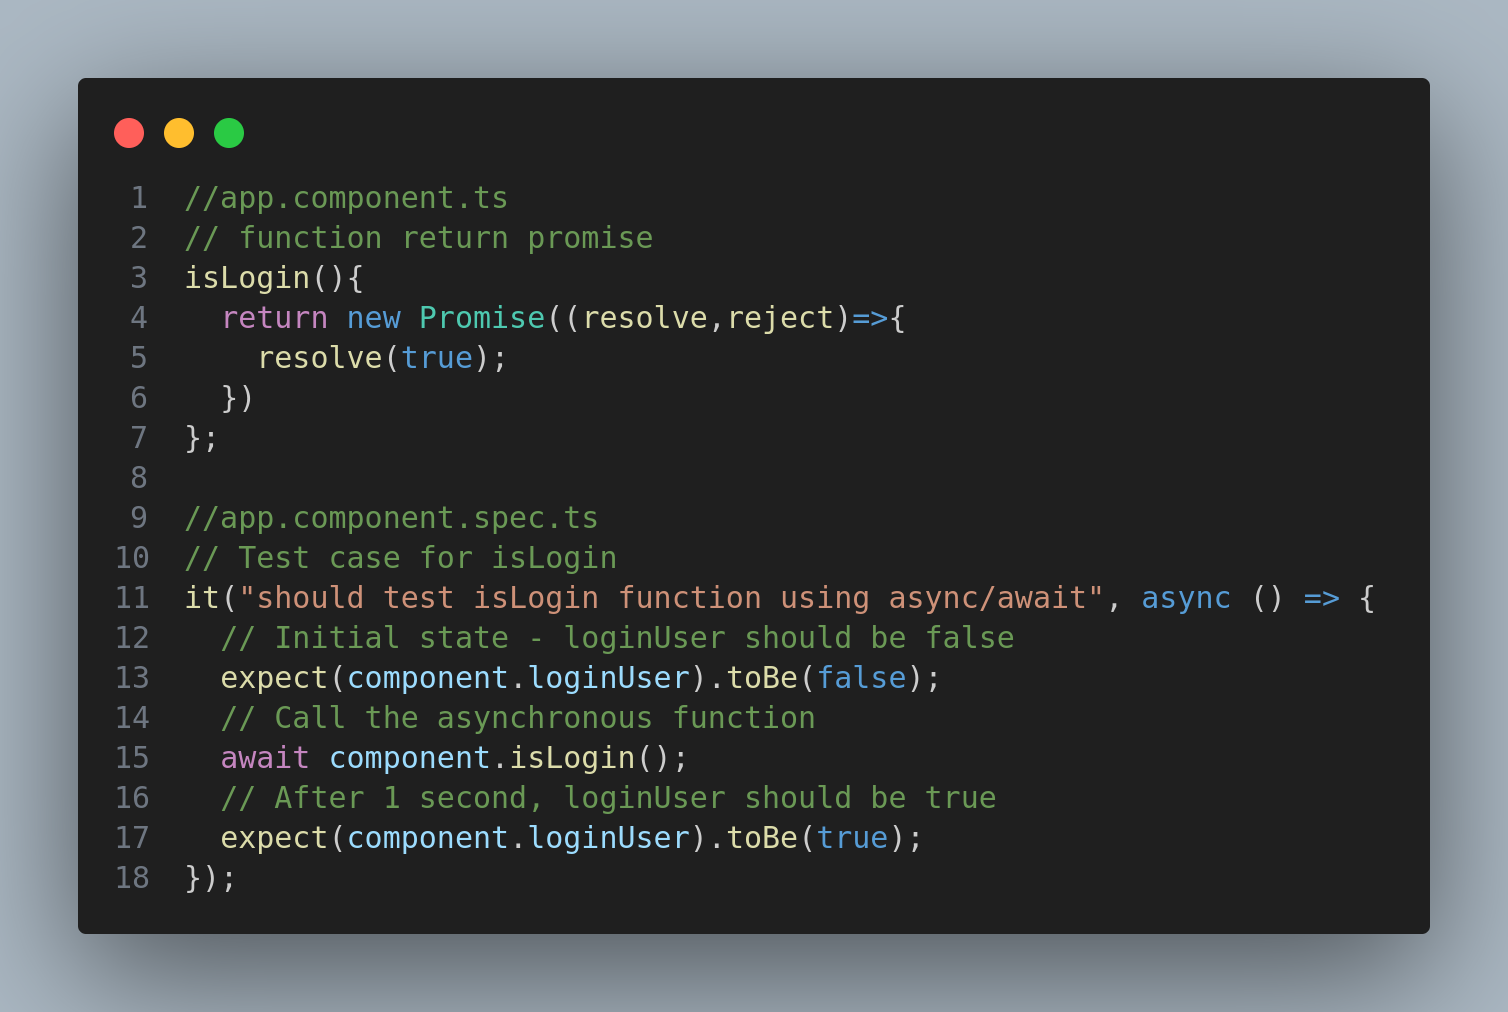
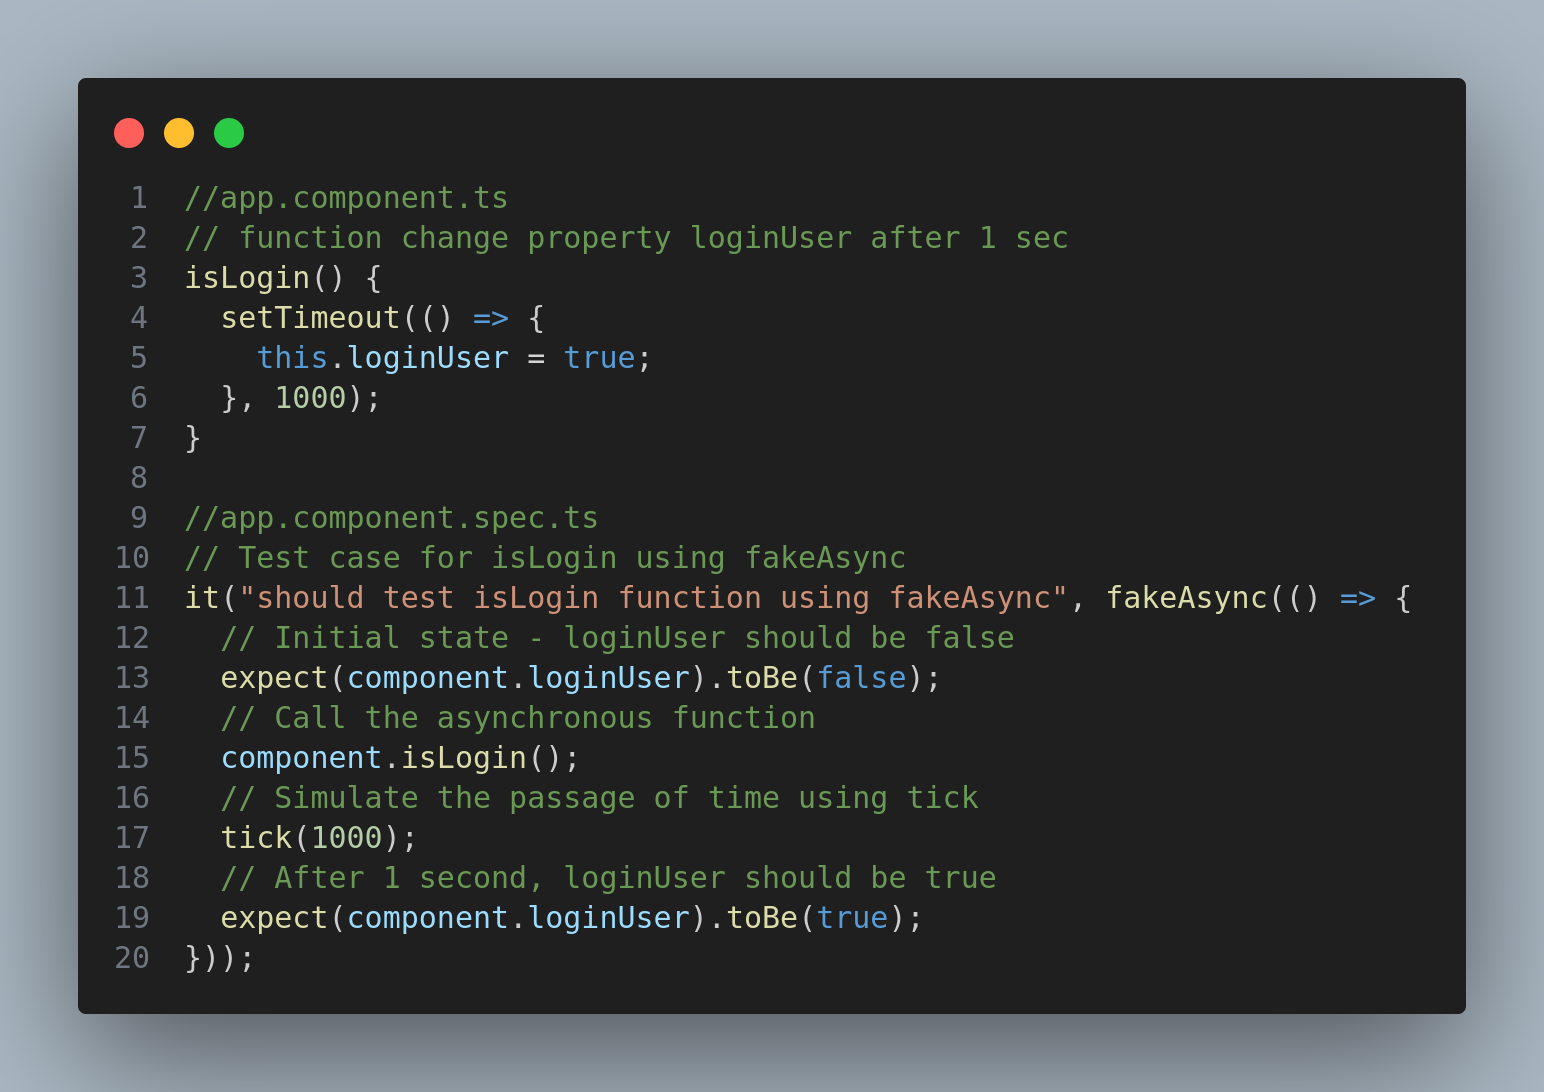
Angular provides three ways to test asynchronous code
Using "async" and "fixture.whenStable"
Using "fakeAsync" and "tick"
Using "done: DoneFn"
While testing asynchronous code choosing one from the above depends on requirement. The use of "async" is preferred when we have a test promise or where time is not a critical factor. The use of "fakeAsync" is preferred when we have to deal with time-dependent functionality. The use of "done" is preferred when we have to deal with callback-based asynchronous operations.
Please refer below image to understand the use case of async:
Please refer below image to understand the use case of fakeAsync:
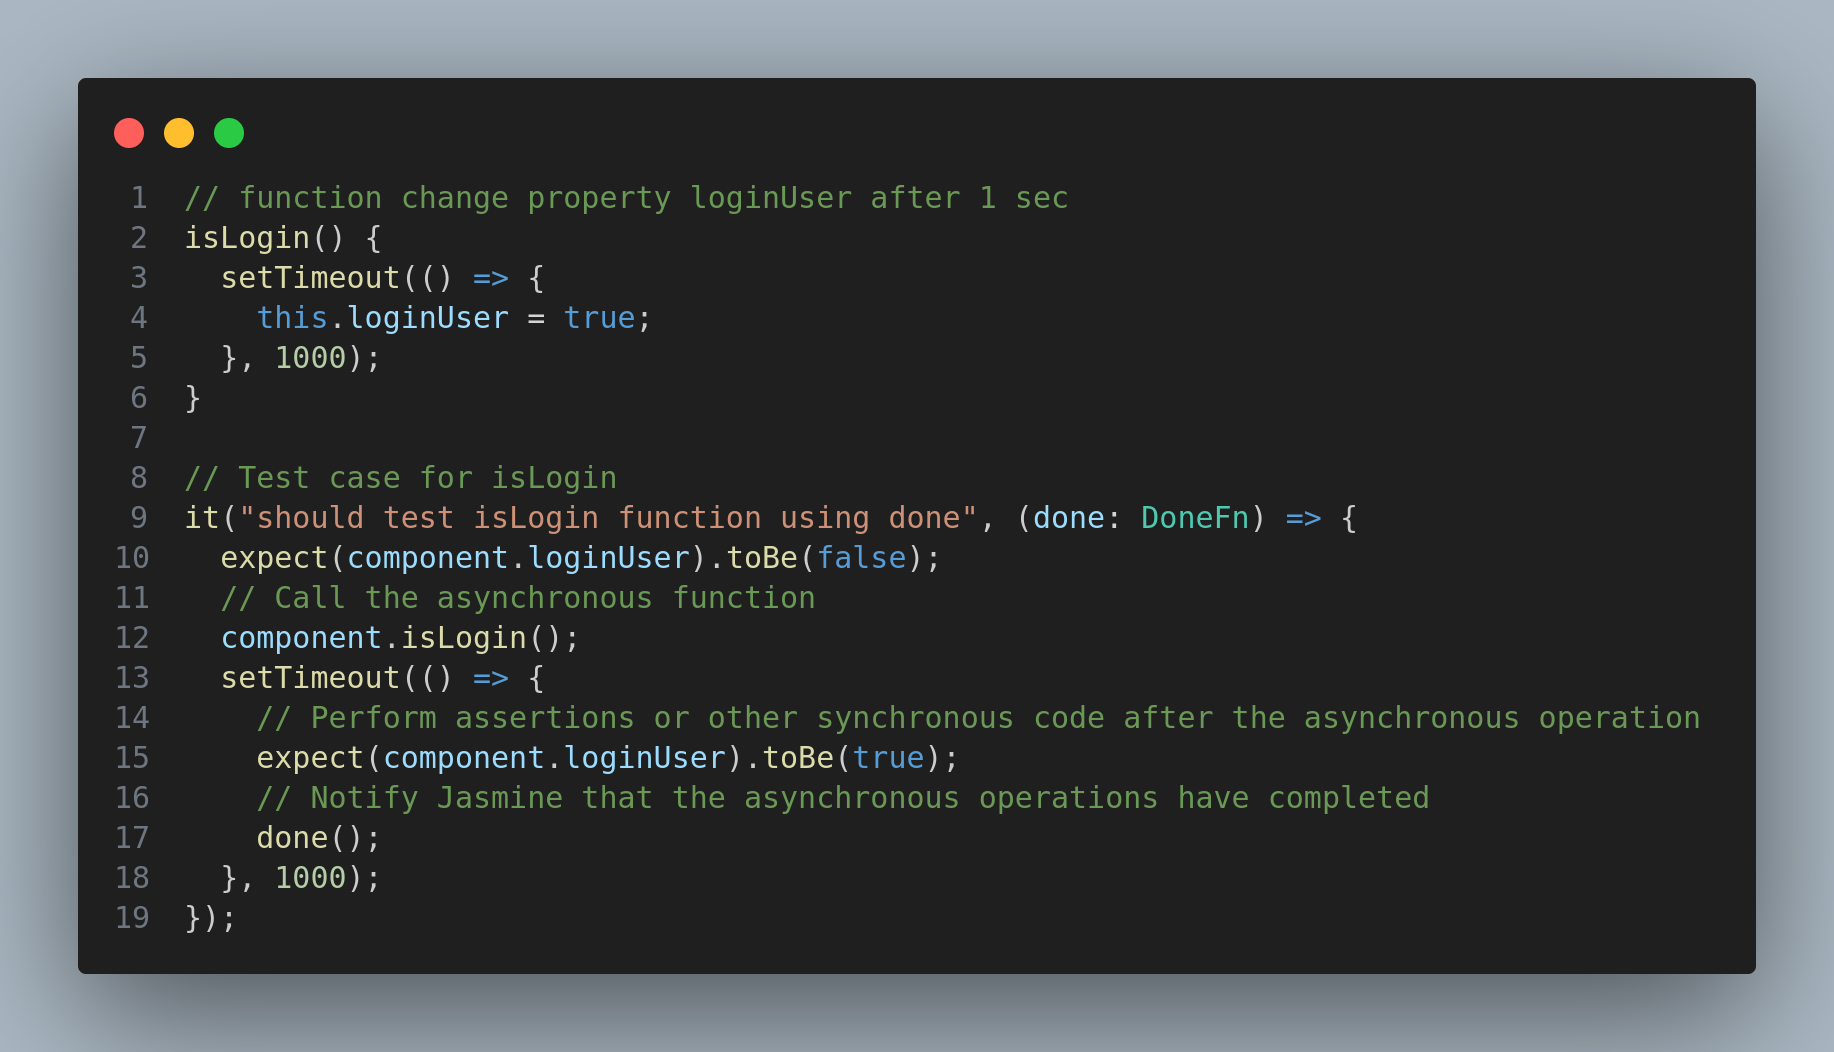
Please refer to the code snippet to understand the use case of done:
Code Coverage
Code coverage is a feature provided by the Jasmine framework that shows how much code is covered in unit testing.
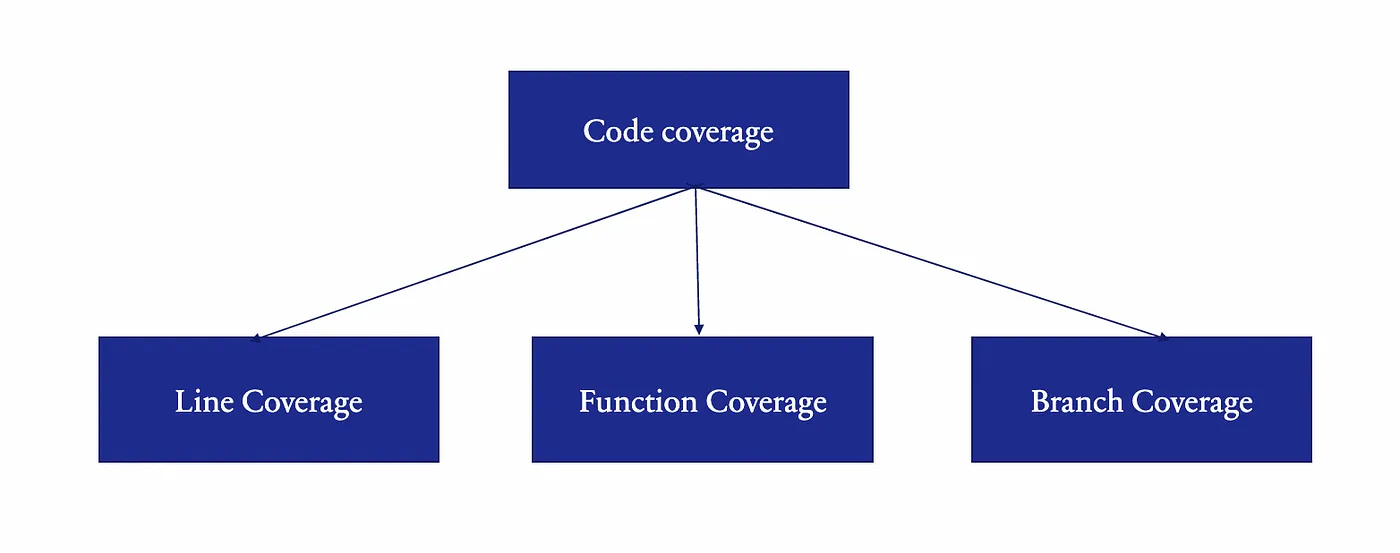
Line coverage
It measures the total percentage of lines which is covered by unit test cases.
Function coverage
Measures the percentage of functions covered by test cases. Useful for detecting unused functions.
Branch coverage
Measures the percentage of branches executed by a test cases.
To check the code coverage of our code use the below command
// no Watch Mode
ng test --code-coverage
// Watch Mode
ng test --code-coverage --watch
when we hit the above command Jasmine creates an angular code coverage folder and inside this folder, we have index.html which contains the code coverage of your application.
When we open the index.html file in the browser it looks similar to the below image:
Best Practices for Writing Effective Test Cases
Follow these best practices to write effective test cases:
Unitwise testing: To ensure that each unit test operates independently, free from dependency on the order of execution or external factors.
Expect pure test output: To ensure that unit tests consistently get the same outcomes when provided same inputs. This practice decreases the conflicts due to undesirable test outputs.
Write readable test cases: Write unit tests in a manner that is easy to comprehend, maintain, and debug. Test cases should be well organized to enhance the overall readability of the tests.
Don't write business logic inside test cases: The spec file is only used to test the code written in the .ts file do not write any other external logic in the spec.ts file
Test cases should be up to date: Any modifications to the codebase should pass the test cases or if any other code is added to our code base then it is a must to write their test cases.
It should meet the standard code coverage percentage: The standard code coverage for Angular tests is 70% to 80%. However, this should not be used as the only measure of code quality, as it is possible to have high coverage with low-quality tests.
In a Nutshell
Unit testing in Angular is a very important practice for ensuring the dependable and estimated outcomes of Angular applications. By using the power of Jasmine and Karma, you can write multiple test cases, to test angular components and structures independently of each other, configure the testing environment with TestBed, and leverage mocking and spying to achieve independent and isolated execution.
With karma and jasmine with best practices in hand, you can definitely validate your code’s functionality, enhance its testing workflow, and build robust Angular applications that meet AAA practices. Explore the realm of unit testing using Jasmine and Karma to unlock the complete capabilities of your Angular apps and projects.
Angular Unit Test Faq's

Related articles