Guide to Using Angular CLI
Ever wondered about manually creating basic files required to run an Angular app? I mean, how difficult will it be for us to write those files one after one? It will consume a lot of time and won't be good for developers, as most of the time would be spent creating those files. Angular CLI is a potent command-line interface tool.
Moving ahead, we are going to discuss everything you need to know :
What is Angular CLI?
How is Angular CLI used?
2.1 Installation
2.2 Various commandsPros of using Angular CLI
Origin of CLI tools
Advantages for developers using Angular CLI
Need of Angular CLI
Future scope
Conclusion
What is Angular CLI?
Angular CLI is a Command Line Interface tool that allows them to initialize, develop, and maintain Angular apps straight from a command shell, instead of the developers having to do it by hand. Just with the help of some commands, a developer can generate various components, services, and also modules.
Files such as 'angular.json', 'package.json', 'tsconfig.app.json', etc. which are considered the basic and important files to run an angular app, are created by the system itself with Angular CLI.
In short, Angular Development can be made easy with the help of the Angular CLI tool. It will help you set up a basic angular project or even a huge angular web application.
Angular CLI Version
2017 saw the introduction of the first beta Angular CLI version. More than 450 variants have emerged since then. A new version of it is issued along with every upgrade to the Angular system. An Angular CLI 12 would also be available if you were using Angular 12.
This does not mean that the version of your Angular project and the Angular CLI have to match. It doesn't the majority of the time. Other versions of the Angular CLI beyond the one included in your Angular project are acceptable.
Installing Angular CLI Major versions follow the supported major version of Angular, but minor versions can be released separately.
Prerequisites
To understand Angular CLI, you need to be familiar with the technologies mentioned below
HTML
CSS
JavaScript
How is Angular CLI Used?
Installation
The javascript run-time environment i.e. Node.js & npm(node package manager) are the two essential things that should be installed in the O.S to create an Angular application. We need the npm package manager to install and maintain the third-party packages. Further, to install Angular CLI, we need to type the command “npm install -g @angular/cli” in the command shell.

Various Angular CLI Commands
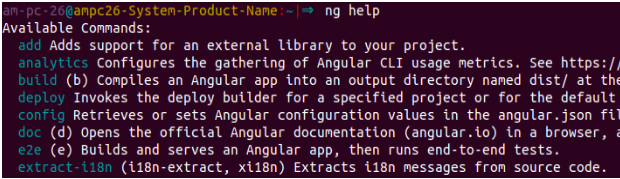
i) ng help
This command, when typed, provides a list
of various commands and provides the specific information of
each command.
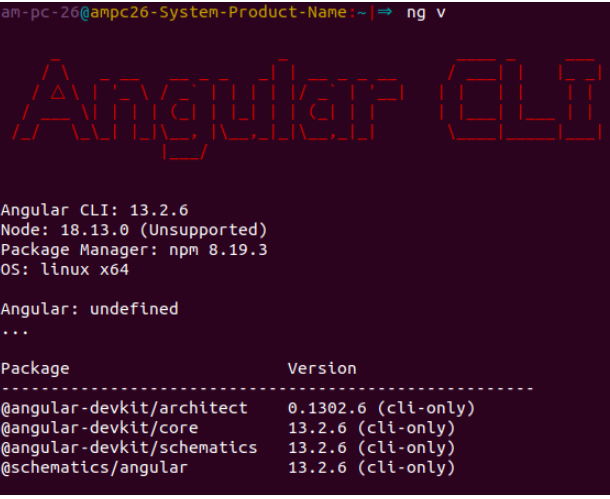
ii) ng version
This command, when typed, gives the
information about the version of Angular CLI installed on your
machine.
iii) ng new
This command is used to create a new angular project. To do so, we have to type the command “ng new <project-name>”
in the command shell.
For example, if our current project name is firstAngularApp, then
We have to type “ng new firstAngularApp” in the command
shell.

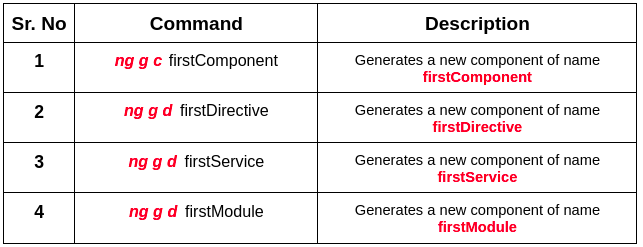
iv) ng generate
This command is used to make different features required for
running an angular application. The command to generate such
features is “ng g <feature> <feature-name>”.
The below table shows different features created along with their
Description.
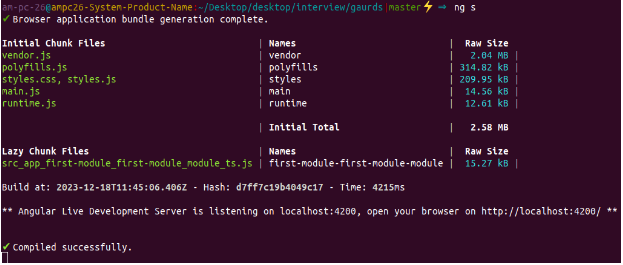
v) ng serve
This command, when typed in a command shell, runs our
Application in either the workspace or development server mode. We can also start our app by
running the command “ng s”. By default, the server will start
running at port no. 4200.
vi) ng update
This command when typed in the command shell, performs an
update to the current stable release of the original framework and
Also of CLI by running the command
“ng update <package-name>”.
The package name is very important here and after the
package name, we can specify the options too. Some examples
are –force, –from, –help, etc.
It is recommended that a developer always update minor versions of the packages
to their latest patch version, as it has the latest bug fixes.
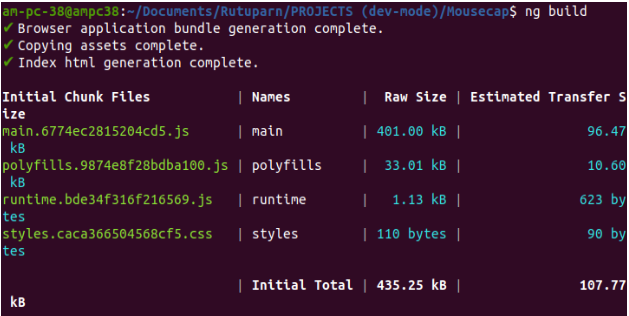
vii) ng build
This command compiles the angular application and the
the output directory of that compilation is placed in a folder called “dist”.
The produced output path of the dist file is then used to run our application in
production mode. Also, we can specify the options.
3. Pros of Using Angular CLI
Time Management
Angular CLI plays a very important role in reducing time for developers. Each
time a developer creates a new component/module or even a service, angular
creates all the files related to the feature and makes changes in our angular app
without interfering with other files. This saves a lot of time for developers in the
development of angular applications.
Dynamic File Creation with Angular CLI is Easy
Angular keeps track of files being added or removed during the development
work of an application. For instance, if we have to create a new component, then
there can be one way where we will use the Angular CLI command
“ng g c <name>”.
This command will automatically create 4 files which include
the spec file, src folder, component file, CSS & template file, and add the component class
name in the declaration field of the corresponding ngModule. The image for the how command creates the
same is provided below. A lot of time is saved by developers here too.

Maintainance of the Folder Structure on its Own
It is very important to maintain the folder structure of a project as it makes it easier
for developers to fetch particular required files whenever they want.
As mentioned earlier, angular keeps track of files that are being added or
removed during the development of the application.
So, during this process, the developer does not need to maintain the files if he/she makes some changes in
the application. Angular CLI makes sure every performed action is detected &
all the files that were supposed to be added/removed during that process are
maintained in the project root folder structure as well as in the codes.
Continuous Improvement
A continuous improvement in the code files is what makes an application better
and better. Even after running the application in production mode, we are still
able to make changes to our own workspace directory or project folder, and after those changes, we can update the
same in our angular application. By doing so, a continuous updation is
established and hence we can improve our application from time to time.
Auto-updation of Files
After creating any component or any other features, there will be an update
in the corresponding module and that particular component or feature will get
imported to the root module and will get added to the declaration’s property of that root component or corresponding
module.
When we use Angular CLI, it helps in reading and writing the files which creates
auto-updation file changes in those corresponding files and modules and this happens when
we use Angular CLI instead of doing it manually.
4. Origin of CLI Tools
The Birth
Command-line interfaces emerged in the mid-1960s, on the computer terminals. It was a user-friendly alternative to punched cards.
Other Alternatives
We can also use GUI (Graphical User Interface), a very user-friendly way to execute tasks. However, a GUI requires more system
resources compared to a CLI (Command-line interface) to implement.
5. Advantage for Developers Using Angular CLI
No Need for Manual File Creation by the Developers
Angular CLI has something like a code generator, which can
create all features like components, services, modules, etc, required in
an angular application. With this, developers need not generate the
same files by themselves.
Support for Testing
There are tools in Angular CLI that can run unit tests, E2E(End-to-End)
tests, etc. With this, a developer can ensure that the code is of high
quality and bug-free.
Good Integration with Other Tools
Angular CLI integrates with various tools such as Git, and IDEs like
Visual Studio Code, etc. It makes it easier to work with the Angular app code and ecosystem. Having such a good integration leads to better coordination within the team & writing efficient codes.
Package Installation at One Click
Angular CLI can install/uninstall third-party packages into and from the application, respectively. It saves a lot of code writing work by the developers.
Saves Time and Effort
Angular CLI sets us free from the redundant javascript code and helps us to focus more on the important things that are supposed to be built.
6. Need for Angular CLI
Working with Internal Files
Suppose we try to create an Angular application without using Angular CLI. In that case, there is a huge possibility of encountering numerous compilation errors related to the undefined path, undefined classes, or missing decorators. It will be a mess to solve those errors.
Further, if we overcome this problem, the next big thing that is waiting for us is to write the boilerplate code after creating even a few project configurations for a single component, service, module, etc.
For example, if we have to create a new component in our application, the first thing we should do is create a folder containing 4 files: component class files, spec files, templates, and CSS files.
Continuing it, we have to link the template file to our component class file. And at last, we have to provide the component class name in the declaration field and the configuration file of its corresponding ngModule.
import { Component, OnInit } from '@angular/core';
@Component({
	selector: 'app-first-component',
	templateUrl: './first-component.component.html',
	styleUrls: ['./first-component.component.css']
})
export class FirstComponentComponent implements OnInit {
	constructor() { }
	ngOnInit(): void {
	}
}
Code snippet displaying ’FirstComponentComponent’ component class
As discussed above, there is a huge possibility of encountering basic errors during typing. This is a waste of time as a human mind can make mistakes while writing code.
We need some functionality that can carry out such typing tasks without producing any errors & delivering the required output, and here Angular CLI comes into the frame. Angular CLI creates required and generated files directly based on the given command, given to it, by itself.
Working with External Files or Packages with Their Latest Versions
While building an angular application, we may come across a point where we
need to import some third-party libraries or packages. After importing such
packages, some functions of those packages might not work or might be
Deprecated. In this situation, we need to update those packages or even
download the old version of it. Manually doing it is very time-consuming even
Though we know the correct version.
The Angular CLI command “ng update” will not only update the corresponding
package to its updated version but also overwrite the version of it in the
dependencies in the file package.json. So, using Angular CLI makes it very
efficient in handling those package versions.
Management of Packages
Angular CLI takes care of processes like installation and uninstallation of
third-party packages. This results in a reduction of manual effort from
the developers who were required to maintain the dependencies
7. Future Scope
The developers working with Angular, choose the Angular CLI tool as it is the easiest
way to build and maintain Angular applications directly. That is the reason why this tool has a great future
scope. Restricting some of its cons, the overall tool positively provides the best services for
the developers.
8. Conclusion
Roadmap
Within this journey, we have discussed the installation process, various Angular
CLI commands, and the uncountable pros of using Angular CLI. Getting from the initial app and
dynamic file creation to the maintenance of folder and project directory structures, including continuous improvement and very smooth integration with other tools, Angular
CLI has emerged as an important feature in the modern development of Angular.
Is there a need for Angular CLI?
Angular CLI has become a powerful and necessary tool for developers who
are building angular applications. This leads to easier development, resulting in a better overall efficiency enhancement. The time and effort
are reduced for creating manual tasks by automating the creation of the same file by providing a set of convenient commands.

Related articles