Comparison Between Ionic 4 vs Ionic 3
After more than a year of work, the Ionic Framework team has released version 4. The new version offers us significant changes in performance, compatibility with multiple frameworks (not only with Angular as previous versions), new documentation and many other improvements that we will analyze in this article.
Surely you will have many doubts?—?and perhaps fear?—?about this version change. But the good news is that despite the great improvements offered by Ionic 4, migrating from Ionic 3 to Ionic 4 is super simple!
In this article, I want to explain the comparison between Ionic 4 and Ionic 3, as well as the novelties and new concepts of this new version. Let’s see practical examples of how to use the new Ionic CLI, and the new Router. Then at the end, I will guide you on how to migrate your applications from Ionic 3 to Ionic 4.
Web Components
Ionic Framework 4 was completely rewritten to use the Web APIs and each component is packaged as a Web Component. This allows the framework to be projected into the future. To help create the Web Components, the team created a tool called Stencil.
What are Web Components?
Web components are a set of web APIs that allow you to create HTML tags that are reusable and encapsulated. One way to explain the Web Components is to imagine them as reusable user interface widgets that are created using open web technologies. They are part of the browser, and therefore do not need external libraries. With Web Components, you can create almost anything that can be done with HTML, CSS, and JavaScript. In this way, you can create a portable component that can be easily reused. Web components make the browser the one who does more work and in this way, they provide important improvements in the performance and load times of modern applications.
The Web Components are based on the following specifications:
- Custom Elements: Defines the bases and the fundamentals to design and use new types of DOM elements.
- Shadow DOM: Defines how to use encapsulated styles and code within a web component.
- HTML imports: Basically defines how to include and reuse the HTML document in another HTML document.
- HTML Template: Defines how to declare code fragments that will not be used while the page is loading but could be later instantiated at runtime.
Compatibility with other Frameworks
Since its inception, Ionic Framework was built using Angular. But now with the popularity and support of web components, this has changed.
One of the great changes of this new version of Ionic is that it is completely independent of the base framework (previously this place was occupied only by Angular).
Since the components of the Ionic Framework, such as <ion-button>, are now encapsulated as Web Components, it is no longer necessary to bind to a base framework. Web components work with any framework, in fact, if you prefer you can not use any Framework.
What the Ionic Framework team intends with this change is that Ionic is a UI Framework that can work with whatever technology the programmers choose. This opens the door to future applications that can be created in Vue or in React using the Ionic web components.
Ionic CLI on Ionic 4 The CLI 4.0 has been totally improved both in the features it offers and in its speed and ease of use.
In order to use it, we must have the latest version of the CLI in our development environment. We can install it by running the following command:
npm install -g ionic @ latestTo use the latest version of the CLI we must have installed node 8.9 or higher.
Once the new CLI is installed, we can now create our first application with ionic 4. Running the following command, the CLI will create a new application with the basic structure of Ionic 4:
ionic start appName blank --type = angularappName is the name of your project
blank is the template that we choose to create the skeleton of the application
type = angular is the type of project
Then to test your application in the browser you can run the same command that we used before in Ionic version 3.
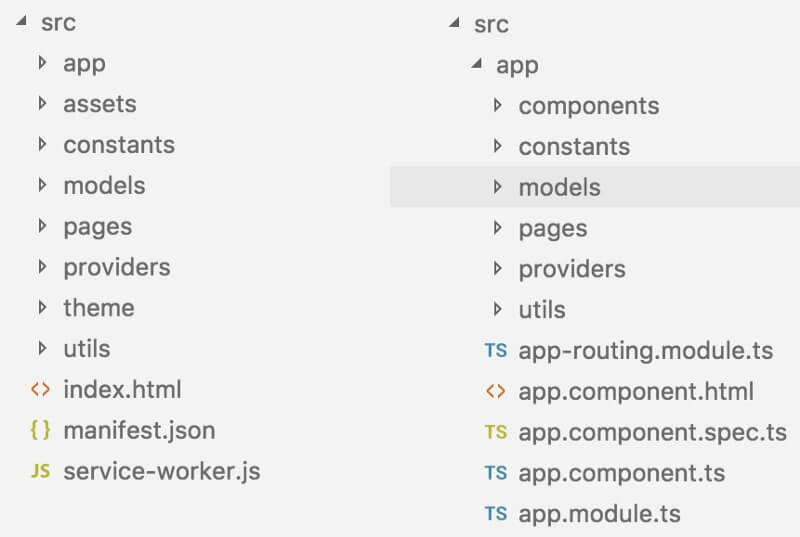
ionic serveThis is the structure of our new Ionic 4 application generated with the CLI:
 With this new CLI, we have the possibility to use console commands to create new pages, components, directives, and services. Let’s see some examples:
Create page :
ionic g page UserCreate a new Service :
ionic g service ItemThese are just some of the new functionalities that the new CLI, explore the new Ionic documentation& features for details.
Navigation on Ionic 4
There are great changes in the navigation and the Router, which in my opinion makes it much simpler and more understandable. Ionic 4 now uses the Angular Router.
Ionic 3 used navigation based on a simple stack where the new pages were placed on top of the stack doing push and when we wanted to navigate backward we simply made a pop of the last page.
Traditional websites use a linear history, which means that the user navigates to a page and can press the Back button to navigate.In Ionic Framework, applications can take this a step further by allowing parallel navigation. Which means that it is possible to have multiple navigation batteries and exchange them at any time. An example of this would be having navigation with tabs on one page and another with a side menu.
Something important to mention is that NavController and ion-nav in Ionic 4 have become obsolete.You can still use them, but only if your application does not use Lazy Loading.
Instead of ion-nav and NavController , Ionic 4 now uses @ angular / router.
As we already said, when creating an angular type application, Ionic 4 uses the navigation of Angular 6. That is why when creating our ionic 4 application of angular type we are automatically created an app-routing.module.ts file located in src / app.
Let’s see what this file has and what are the differences with an application in Ionic 3.
In Ionic 4:
import {NgModule} from '@ angular / core';
 import {Routes, RouterModule} from '@ angular / router';
const routes: Routes = [
 	{path: '', redirectTo: 'home', pathMatch: 'full'},
 	{path: 'home', loadChildren: './pages/home/home.module#HomePageModule'},
  ] ;
  @NgModule ({
  imports: [RouterModule.forRoot (routes)],
  exports: [RouterModule]
  })
  export class AppRoutingModule {}
To navigate to the HomePage we must do the following:
import {Router} from '@ angular / router';
constructor (private router: Router) {}
	navigateToHome () {
		this.router.navigate (['/ home']);
	}
In Ionic 3:
import {NavController} from 'ionic-angular';
import {HomePage} from './pages/home/home'
constructor (public navCtrl: NavController) {}
 navigateToHome () {
 this.navCtrl.push (HomePage);
}
It is important to understand that in Ionic 4, navController is no longer used to navigate the application.
Example navigation on Ionic 4
Let’s take a step further and see how to pass information between two pages in Ionic 4.
// item is an object of the style: {title: "Some title",
 description: "Some description"}
 itemSelected (item) {
  this.router.navigate (["/ home", item]);
}
Then, to obtain the item object in our HomePage, we use the ActivatedRoute.
import {ActivatedRoute} from '@ angular / router';
export class HomePage implements OnInit {
item: any;
constructor (private route: ActivatedRoute) {}

ngOnInit () {
     this.route.params.subscribe (data => {
          this.item = data;

})
}
}
Life cycles of navigation (LifeCycles)
The lifecycles (known as lifecycles in English) that were used in Ionic 3 as for example ionWillLoad will no longer be used in Ionic 4. Now we will use the Angular life cycles such as ngOnInit and ngAfterViewInit .
If you have already programmed at Angular, this will sound familiar to you. If you want to learn more about Angular, I suggest you read this post .
Router Link
In Ionic 3 the event (click) is used to navigate between pages from the HTML. In Ionic 4 we will use the routerLink, as it is used in the Angular applications.An example would be:
<ion-button [routerLink] = "['/ product / 123']"> Go to Product 123 </ ion-button>Modules
It is important to mention that it is no longer necessary to import the pages and services in the app.module.ts file, which in my opinion makes the project much simpler and more organized.
For each page, there will be a module of that page. For example, if we want to use Reactive Forms on any page, we only import ReactiveFormsModule on the page or pages that will use it.
The code below is from the src / app / pages / new-item / new-item.module.ts of our example application in Ionic 4 that you can download for free.
import {NgModule} from ' @ angular / core ';
import {CommonModule} from ' @ angular / common ';
import {FormsModule, ReactiveFormsModule} from ' @ angular / forms ';
import {Routes, RouterModule} from ' @ angular / router ';
import {IonicModule} from ' @ ionic / angular ';
import {NewItemPage} from './new-item.page';
const routes: Routes = [
      {
  path: '',

component: NewItemPage
}
]
 @NgModule ({
  imports: [
      CommonModule,
      FormsModule,
      ReactiveFormsModule,
      IonicModule,
      RouterModule.forChild (routes)
      ],
      declarations: [NewItemPage]
 })
 export class NewItemPageModule {}
How to migrate your application from Ionic 3 to Ionic 4?
You are probably wondering how to migrate an existing application from Ionic 3 to one from Ionic 4. The Ionic Framework team has written super detailed documentation with the steps for migration .The truth is that the migration process is quite simple and personally has not generated any problems.You can also use the migration linter which is a tool that automatically checks your code and tells you what changes you should make.
Conclusion on Ionic 3 vs ionic 4


Related articles